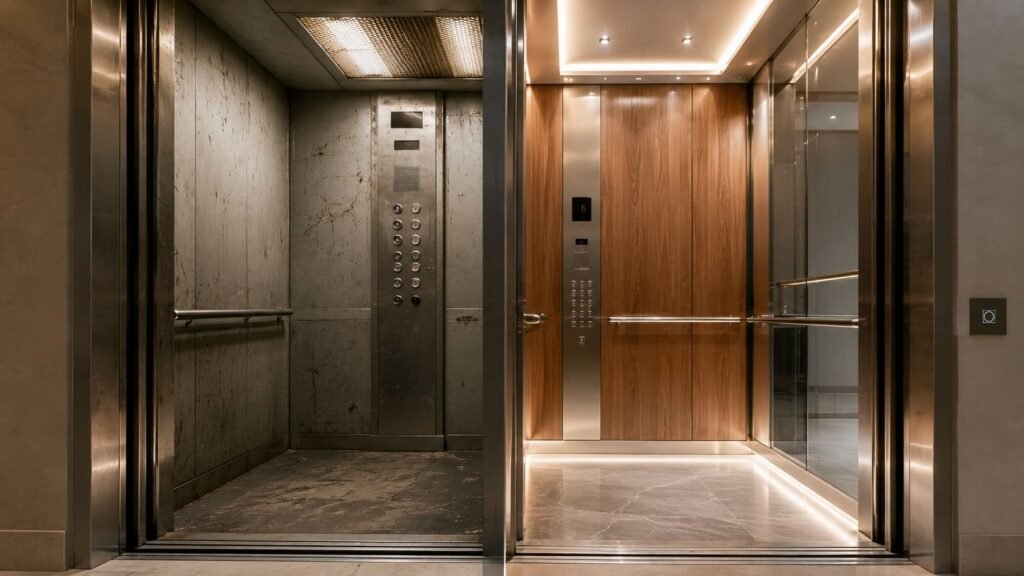
An elevator cab usually gets attention when it's already overdue. The wall panels are scratched, the lighting makes the car look dim and tired, the flooring is curling at the edges, and tenants have started to notice. In a hospital, school, office building, or condominium, that worn cab sends a message every day. It tells riders the building is aging, maintenance is reactive, and details are slipping.
That's why an elevator cab interior upgrade shouldn't be treated as a cosmetic side project. It affects tenant perception, cleaning effort, code compliance, serviceability, and the long-term cost of owning the elevator. A cheap reskin can make the cab look better for a while. A well-planned upgrade can reduce future headaches, avoid vendor lock-in, and hold up under real traffic.
Introduction Your Guide to a Modern Elevator Experience
Most owners start with the visible problems. Buttons are worn. Ceiling panels are dated. Stainless is dented. Laminate corners are chipped. The fan is noisy, and the floor doesn't feel level or safe underfoot. Those aren't small issues. They shape the rider experience every time someone enters the car.

A good elevator cab interior upgrade solves more than appearance. It has to balance durability, code compliance, service access, and budget discipline. Owners who focus only on finish samples often miss the issues that create expensive callbacks later, such as flooring thickness, fire-rated material documentation, or proprietary fixture packages that limit who can service the car in the future.
What owners usually need to decide first
Three decisions drive most projects:
- Scope of work: Are you refreshing finishes, replacing the full interior, or coordinating the cab work with broader modernization?
- Material strategy: Do you want a standard kit, a semi-custom package, or a fully custom interior built for your traffic level?
- Compliance path: Will the selected materials, lighting, fixtures, and flooring pass review without creating a permit or inspection problem?
A cab upgrade works best when the finish decisions are tied to how the elevator is actually used, not just how the sample board looks under showroom lighting.
In Southern Michigan, that practical approach matters. Medical buildings, municipalities, schools, mixed-use properties, and older commercial buildings often need an upgrade that respects an aging system while still meeting current expectations. The right plan protects the building's image, keeps the project serviceable, and avoids turning a straightforward cab refresh into a larger compliance problem.
Why Your Elevator Cab Is a Critical Asset
Many owners still think of the elevator cab as the decorative shell around the equipment. That's a mistake. The cab is the part your tenants, staff, visitors, inspectors, and prospective buyers experience. If it feels neglected, they assume the rest of the building may be neglected too.
The business case for upgrades is easy to miss because the damage is gradual. People don't file formal complaints every time they ride in a dim, scratched, noisy elevator. They just notice. Over time, that affects how they judge the property.
It influences value and tenant confidence
A clean, current cab supports the overall standard of the building. In office and residential properties, that matters during tours, renewals, and day-to-day tenant satisfaction. In healthcare and education, it affects trust. Riders expect the elevator to feel safe, clean, and maintained.
The market direction reflects that priority. The global elevator cab interior market was valued at USD 12,321 million in 2025 and is projected to reach USD 17,202 million by 2034, expanding at a CAGR of 5.0%, driven significantly by retrofit and renovation demand for aging elevator fleets, according to Grand Research Store's elevator cab interior market analysis.
It reduces exposure to avoidable problems
Aging interiors create more than visual wear. Loose flooring edges, poor lighting, hard-to-read controls, damaged handrails, and outdated finishes can all increase risk. Some issues start as maintenance concerns and end as compliance concerns. Others make the car harder to clean and harder to keep presentable.
Here's what a better cab interior usually improves:
- Passenger safety: Better lighting, stable flooring transitions, and clear fixture visibility reduce confusion and trip risk.
- Cleaning and upkeep: Durable, non-porous, easy-wipe materials save labor and stay presentable longer.
- Repair practicality: Thoughtful panel systems and non-proprietary components make future service less disruptive.
Practical rule: If a finish choice makes future access harder, cleaning slower, or replacement dependent on one supplier, it's probably the wrong choice for a working building.
It shapes brand perception every day
Commercial properties spend heavily on lobbies, corridors, signage, and tenant suites. Then riders step into an elevator that still looks twenty years older than the rest of the building. That mismatch hurts the property's presentation.
For hotels, Class A offices, medical campuses, and municipal buildings, the elevator is part of the brand. Even in more utilitarian buildings, a cab should feel solid, bright, and intentional. It doesn't need to be flashy. It does need to look maintained.
Treat the cab like an asset, not trim work. Owners who do that usually make better decisions on materials, compliance, and lifetime cost.
Choosing Durable and Stylish Interior Materials
Material selection is where owners either save money over time or create a repeat project. The wrong finish can look fine on day one and wear badly under carts, stretchers, wheelchairs, deliveries, or wet shoes. The right finish may cost more upfront, but it stays serviceable, easier to clean, and less likely to force an early replacement.

How the common materials compare
| Material | Where it works best | Main advantages | Main trade-offs |
|---|---|---|---|
| High-pressure laminate | Offices, apartments, budget-conscious refreshes | Broad design range, lower upfront cost, replaceable panels | Edges and corners can show wear faster in heavy traffic |
| Stainless steel | Healthcare, education, industrial, high-traffic public buildings | Strong durability, easy cleaning, good impact resistance | Can show dents and fingerprints depending on finish |
| Wood veneer | Upscale residential, hospitality, premium office interiors | Warm appearance, more custom visual character | More sensitive to abuse, moisture, and inconsistent cleaning |
| Glass or mirror accents | Modern commercial and high-end cabs | Creates a brighter, larger feel | Shows smudges, can raise maintenance demands, must be chosen carefully for safety and serviceability |
No material is “best” in every building. The right choice depends on who rides the elevator, what gets wheeled into it, who cleans it, and how often it's occupied.
What holds up in heavy use
High-traffic buildings should be honest about abuse. Carts hit returns. Housekeeping tools scrape corners. Deliveries bump walls. If that's your building, choose for punishment first and appearance second.
A few practical observations matter:
- Laminate is cost-effective, but low-end kit panels can fail at seams, corners, and edge banding.
- Stainless is forgiving in buildings that need frequent cleaning and impact resistance.
- Wood veneer belongs in the right setting, not every setting. It works well where traffic is controlled and the building can support the maintenance standard.
- Mirrors and glass need restraint. Used as accents, they help. Overused, they become a cleaning and replacement issue.
Industry data also highlights a planning gap that owners should take seriously. High-traffic environments like healthcare require updates every 5–7 years, not the standard 7–10, and available content often fails to model the lifecycle differences between custom materials and cheaper laminate kits for those usage cycles, as noted by W.A. Elevator's discussion of cab interior upgrade planning.
In busy buildings, the cheapest package often becomes the most expensive choice after repeat repairs, appearance decline, and early replacement.
Kit interiors versus custom interiors
This is where long-term cost decisions get real.
A kit interior can be appropriate when the goal is a clean, simple refresh with limited design demands. It's often faster to price and easier to standardize. But kits can create problems when they're built around generic dimensions, limited material grades, or bundled components that aren't ideal for the building's actual use.
A custom or semi-custom interior usually makes more sense when:
- The building has sustained heavy traffic
- You need better corner protection or more durable substrate choices
- The cab geometry is unusual
- You want non-proprietary materials and components that any qualified contractor can source later
Flooring deserves special attention because it often wears out first. If you're reviewing material options, this guide to elevator flooring replacement considerations is worth reading before you approve a finish schedule.
A simple way to choose
If the building is premium but lightly used, appearance can carry more weight. If the building is busy, public-facing, or operationally demanding, durability should lead the decision. Good-looking materials matter. Materials that still look acceptable after years of abuse matter more.
Modernizing Cab Lighting Ventilation and Technology
A cab can have beautiful wall panels and still feel outdated the second the doors close. Lighting, airflow, and fixtures shape the ride more than most owners expect. Riders notice glare, shadows, stale air, loud fans, and slow or unclear indicators immediately.
Lighting changes the whole cab
Old fluorescent fixtures make many cabs look harsh, dim, or uneven. Modern LED systems give you better light quality, lower maintenance, and cleaner ceiling layouts. They also improve visibility around the control panel, threshold, and floor surface, which matters for comfort and safe movement.
The practical lighting questions are straightforward:
- Brightness: Is the cab bright enough to feel safe without becoming clinical?
- Uniformity: Are there dark corners, hot spots, or shadows at the controls?
- Serviceability: Can lamps and drivers be replaced without turning a simple repair into a parts chase?
For many owners, the best answer is a simple LED ceiling package with diffused light and readily serviceable components. If you're looking at that option, this overview of elevator LED lighting upgrades can help frame the decision.
Ventilation should be quiet and unobtrusive
Ventilation gets ignored until tenants complain that the car feels stuffy. A noisy fan can make a decent elevator feel cheap. A weak fan makes a small cab uncomfortable fast, especially in summer or in buildings with steady traffic.
A good setup does three things well:
- Moves enough air to keep the cab comfortable
- Keeps noise under control
- Allows maintenance access without disassembling major finish components
A fan shouldn't announce itself every time the doors close. If riders hear the ventilation before they notice the finishes, the cab needs attention.
Technology should solve a real problem
Not every cab needs digital displays or advanced user interfaces. Some do. In medical, institutional, or premium commercial settings, upgraded indicators, clearer communication devices, and cleaner fixture presentation can improve both function and perception.
Useful upgrades often include:
- Clearer floor indicators that are easier to read at a glance
- Updated alarm and communication fixtures with better visibility
- Integrated ceiling and fixture layouts that make the cab feel coordinated instead of patched together
The mistake is adding technology that complicates maintenance without adding value. Owners should ask one simple question before approving any tech feature. Can it be serviced reliably, with commonly available parts, by qualified contractors who didn't install it?
Navigating Elevator Code and Accessibility Rules
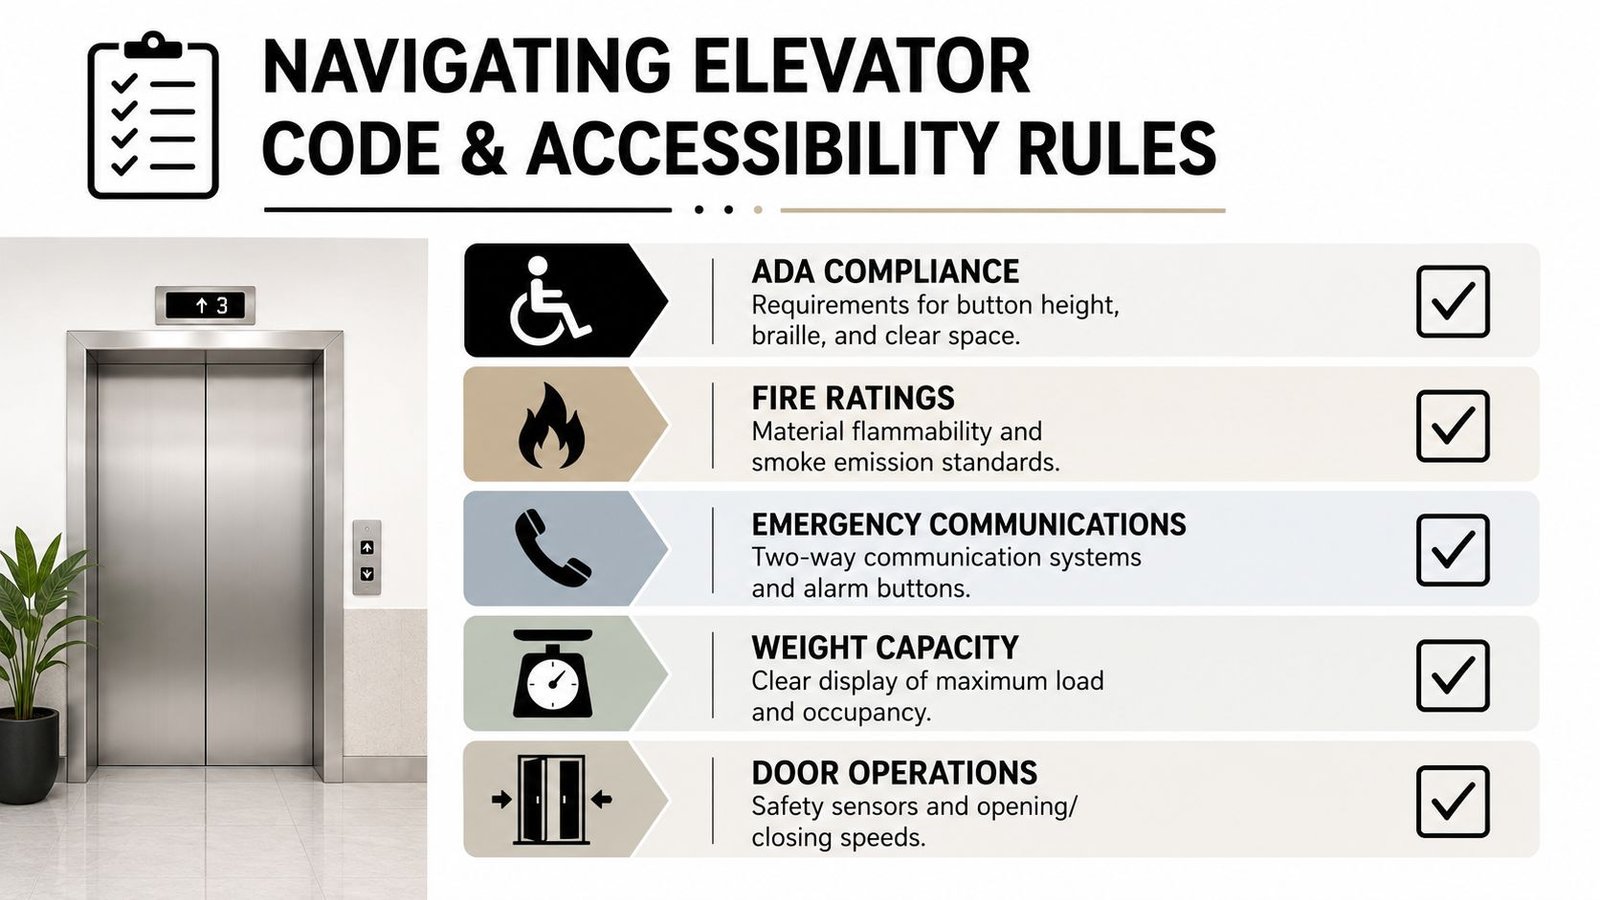
Interior projects often go off course. The finishes look good on paper, but small technical details create inspection problems, permit delays, or future service headaches. A compliant elevator cab interior upgrade isn't just about selecting attractive materials. It's about making sure every visible improvement still works within the elevator's regulatory and physical limits.
Accessibility details need to be built in
ADA-related issues often show up in the fixtures and rider interface, not just the wall panels. Control panel height, tactile markings, braille, handrail placement, visual indication, and clear maneuvering space all matter. If an upgrade changes panel depth, flooring height, or fixture arrangement, it can affect usability and compliance.
Owners don't need to memorize every rule, but they do need to make sure the contractor is reviewing the entire rider environment, not just swapping finishes. This is especially important in older cabs where past modifications may already have reduced margins.
For a focused overview, review these ADA elevator compliance considerations before approving fixture and layout changes.
Fire ratings and material paperwork matter
Interior work often triggers document review that owners don't anticipate. Adhesives, wall finishes, ceiling components, and flooring systems may need to meet fire-related requirements for approval. If a vendor sells a generic kit without clear documentation, the owner can end up stuck between installer claims and inspector questions.
That's one reason non-proprietary, documented materials are so important. You want finishes and adhesives that are code-appropriate and traceable without being locked into one manufacturer's closed ecosystem for future replacements.
Small dimensional errors can create real hazards
One of the most overlooked issues in cab work is flooring thickness. It sounds minor. It isn't. Current guidance often omits the fact that flooring thickness tolerances must exactly match the removed material to maintain door sill alignment and avoid tripping hazards. The same guidance often fails to explain how owners can choose non-proprietary finishes that meet evolving fire-code expectations without being forced into proprietary manufacturer systems, as noted in Stanley Elevator's guide to elevator modernization.
That detail matters because flooring changes affect more than appearance. They can influence:
- Door sill alignment
- Threshold transitions
- Trip risk at the entrance
- How the cab floor meets the existing structure
If the new floor assembly changes height, even slightly, the project needs a proper review before installation. Fixing it after the fact is harder and more expensive.
Why non-proprietary matters for compliance and cost
Proprietary interior packages can look convenient during bidding. The problem comes later. If replacement panels, fixtures, or finish parts can only be sourced through one channel, the owner loses flexibility. Service costs become less predictable, lead times can stretch, and future updates may force matching a legacy system instead of choosing the best current option.
A non-proprietary approach usually gives owners better control in four areas:
| Issue | Proprietary approach | Non-proprietary approach |
|---|---|---|
| Replacement parts | Limited sourcing | Broader sourcing |
| Future service | More installer dependence | More contractor flexibility |
| Finish updates | Often tied to one system line | Easier to match or revise |
| Long-term budgeting | Harder to predict | More competitive quoting |
For Michigan owners, that flexibility matters. Codes, material availability, and operational needs change. A cab should be upgraded in a way that keeps the elevator maintainable, inspectable, and serviceable for years after the project closes.
Understanding the Cab Upgrade and Modernization Process
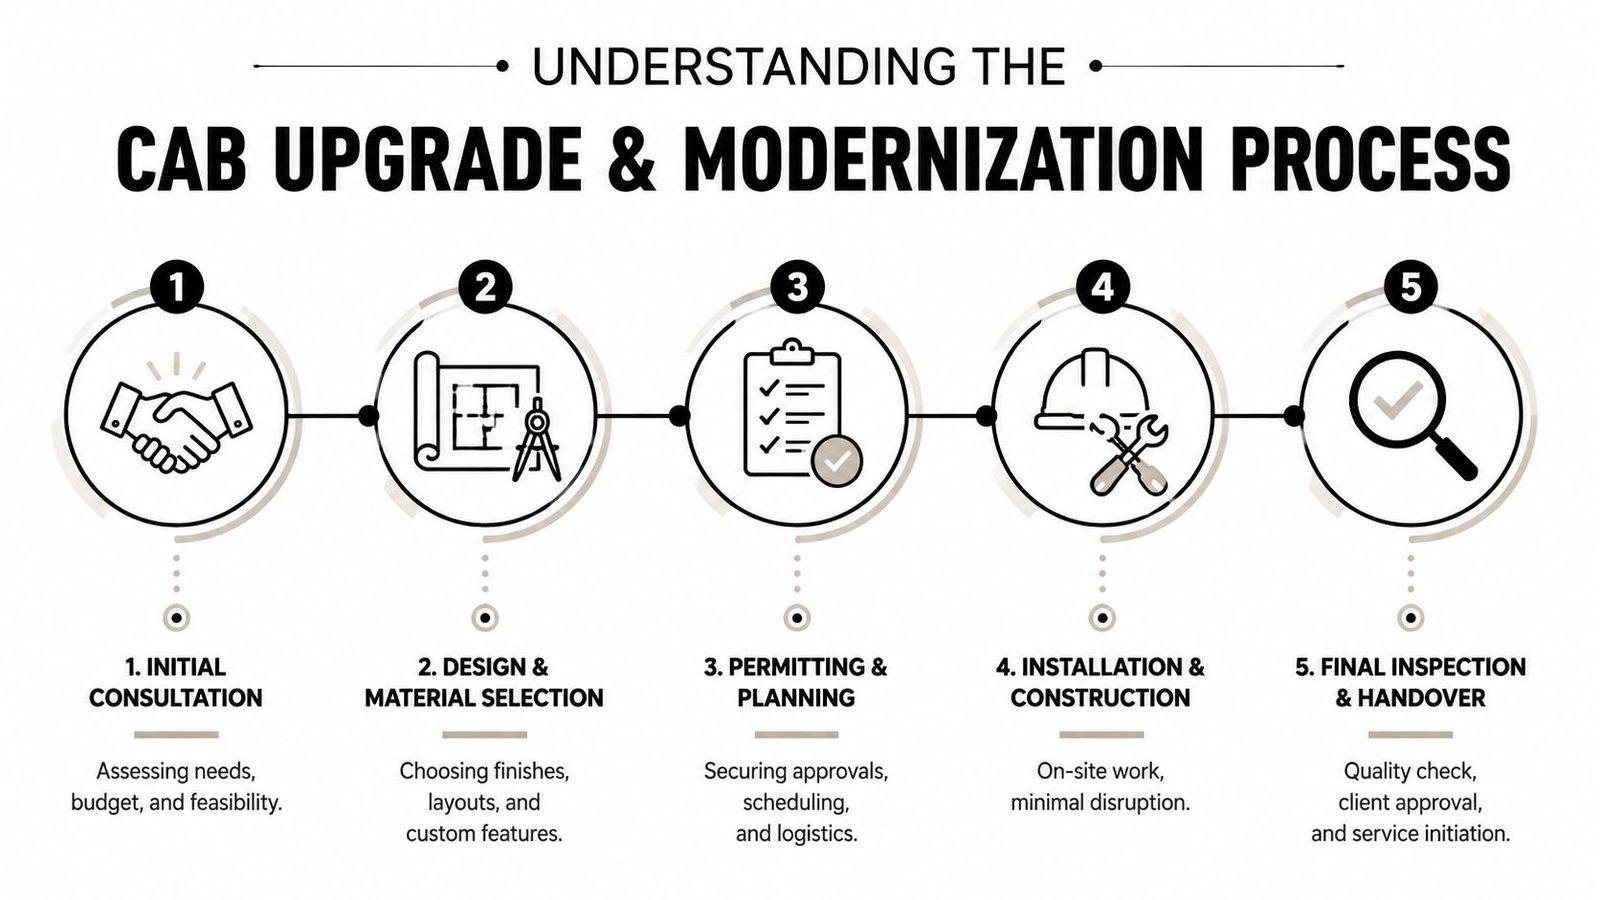
Owners usually worry about two things before a cab project starts. How disruptive will it be, and how many surprises will appear once the work begins? A professional process reduces both. The project should feel structured, not improvised.
The project usually starts with field verification
No reliable cab proposal comes from finish samples alone. The contractor needs to inspect the existing car, confirm dimensions, review the condition of the shell, check fixture locations, and identify any issues that could affect permits or installation. Older elevators often contain field conditions that don't match original drawings.
This early step is also where smart owners raise operational questions. Can the work be phased? Does the building have another elevator in service? Are there delivery windows, patient transport needs, or tenant access concerns that affect scheduling?
Design should follow real conditions
After field verification, the project moves into material selection, layout confirmation, and fabrication planning. At this stage, many problems are either prevented or created. A good design package considers finish durability, panel construction, lighting integration, flooring thickness, and fixture coordination at the same time.
The broader market shows why this work continues to grow. The global elevator modernization market was valued at USD 9.46 billion in 2024 and is estimated to reach USD 14.11 billion by 2033, with a CAGR of 4.31%, reflecting the scale of investment going into aging infrastructure renewal, according to IMARC Group's elevator modernization market report.
Here's a short look at the process in motion:
Installation should be controlled, not rushed
The best installations are calm and methodical. Existing finishes are removed carefully. Substrates are checked. New materials are fitted with attention to edges, transitions, and access points. The work needs to preserve function, not just visual appearance.
A sound installation plan typically includes:
- Protected staging: Materials are brought in without damaging adjacent finishes.
- Controlled removal: Existing components are taken out without harming fixtures or structure that remain in service.
- Fit and alignment checks: Panels, ceilings, and flooring are verified before final fastening.
- Functional review: Doors, thresholds, fixtures, and communication devices are checked after interior work is complete.
Clean installation work is usually a sign of good project management. Sloppy edges, uneven reveals, and field improvisation tend to show up later as maintenance issues.
Final review closes the loop
The project isn't done when the finishes are installed. It's done when the interior is cleaned, inspected, documented, and handed over with clear understanding of what was changed. Owners should expect a final walk-through that confirms appearance, operation, and any relevant compliance items tied to the scope.
That final review is also the right time to discuss future maintenance. Some finishes need specific cleaning methods. Some replacement parts should be documented. A good handoff helps the upgraded cab stay presentable instead of declining in the first year because no one was told how to care for it.
How to Budget for Your Elevator Interior Project
Budgeting goes wrong when owners ask for a single number too early. Cab upgrades vary because scope varies. A modest finish refresh doesn't cost the same as a full interior rebuild with new lighting, fixture work, and permit coordination. Before you compare quotes, define what problem you're solving.
Start with the scope, not the finish board
Most projects fall into one of these buckets:
- Cosmetic refresh: Replacing selected wall panels, ceiling elements, flooring, or surface finishes while keeping most components in place
- Full cab interior replacement: New panels, ceiling, lighting, flooring, reveals, and coordinated finish package
- Interior work tied to modernization: Cab work performed alongside broader equipment or control upgrades
Those categories matter because the hidden work often drives cost more than the visible décor. Substrate condition, fixture relocation, permit requirements, and access limitations can change the price quickly.
The cheapest quote can cost more later
When quotes come in far apart, look past the finish names. Ask what's included, what's excluded, and what assumptions were made about field conditions. A low price may leave out documentation, code-related corrections, lighting coordination, or better-performing materials at corners and high-impact zones.
Review each proposal for these issues:
- Material grade: Are you comparing the same quality, or just similar appearance?
- Component type: Are the fixtures and finishes non-proprietary?
- Preparation work: Does the quote address substrate correction or only surface installation?
- Service impact: Will future replacement parts be easy to source?
A practical budget isn't only about first cost. It's about how long the interior stays acceptable, how easy it is to repair, and whether the project avoids creating a new compliance problem.
Build contingency into the conversation
Older elevators often reveal surprises after demolition starts. Existing floor buildup may not match records. Hidden damage may appear behind panels. Prior alterations may need correction. Owners should discuss how such discoveries are handled before the work begins, including who approves changes and how pricing is documented.
Financing can also make a better scope more manageable. Instead of forcing the project into the smallest possible package, some owners prefer to spread costs in a predictable way and address the cab properly once, rather than patching it twice.
A Final Checklist for Your Upgrade Decision
A strong elevator cab interior upgrade holds up in three ways. It looks appropriate on day one, stays serviceable over time, and doesn't create future compliance or sourcing problems. That's the standard worth using when you evaluate options.
Before you approve a contractor or design package, walk through these questions:
The decision checklist
- Have you defined the goal? Aesthetic improvement, durability, compliance correction, or coordination with larger modernization work each call for a different scope.
- Do the materials fit the traffic level? A premium-looking finish that can't handle carts, stretchers, deliveries, or heavy cleaning isn't a savings.
- Have you reviewed lifecycle cost, not just bid price? Early wear, difficult cleaning, and limited part availability can erase an apparent bargain.
- Is the flooring assembly being checked carefully? Floor height and transitions need to work with the existing sill and entrance conditions.
- Will the selected finishes and adhesives support approval? Product documentation should be clear before the project starts, not chased later.
- Are accessibility details fully reviewed? Controls, markings, handrails, and rider usability should be part of the plan.
- Are the components non-proprietary where possible? That helps preserve service flexibility and competitive pricing later.
- Does the contractor's process include field verification and final review? Good projects are measured, documented, and handed over cleanly.
Good cab upgrades age gradually and predictably. Bad ones look tired early, become hard to maintain, and trap the owner into expensive next steps.
If you can answer those questions clearly, you're in a good position to move forward. If you can't, pause before signing. A little more diligence at the front end usually saves far more than it costs.
If you're planning an elevator cab interior upgrade in Lower Michigan, Crane Elevator Company can help you evaluate the project with a practical, non-proprietary mindset. Their team handles modernization, repairs, inspections, and maintenance across all makes and models, with a focus on compliance, serviceability, and long-term cost control. Reach out for a second opinion, a competitive quote, or guidance on an upgrade path that won't lock your building into higher lifetime costs.