You've got a renovation budget, a preliminary elevator quote, and a building that needs reliable access between floors. Then someone asks who's responsible for the pit, whether groundwater will affect excavation, and when the inspector can come. Suddenly, buying the elevator looks like the straightforward part.
A successful hydraulic elevator installation starts below the car and continues beyond its first ride. The owner, general contractor, elevator contractor, engineer, and maintenance provider need a shared plan for the site, permits, pressure system, and turnover. That's how you keep an equipment purchase from becoming an open-ended construction project.
Hydraulic Elevator Installation Timeline and Phases
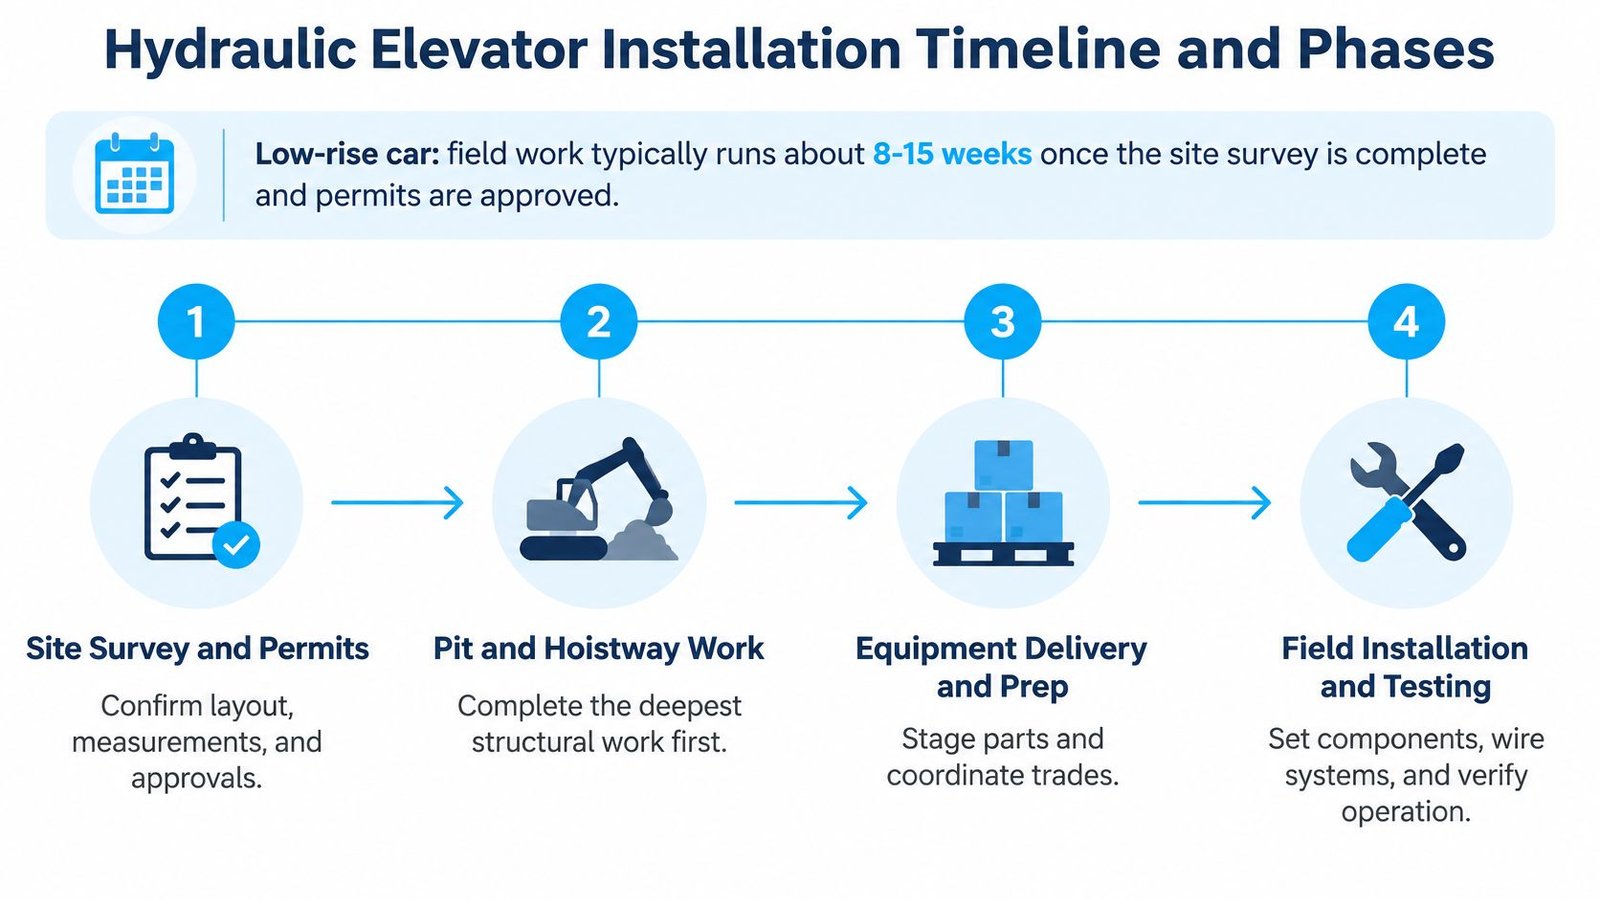
For preliminary planning, consider a hypothetical low-rise project with an 8-15-week field-work allowance after the survey and permit approvals. That's a scheduling example, not a promised industry duration. Your contractor should replace it with dates tied to the actual structure, groundwater conditions, equipment delivery, and inspection availability.
Installation phases and typical durations
The allowances below illustrate how to organize a proposed schedule. Some activities overlap, so don't add the rows together and treat the total as a completion guarantee.
| Phase | Typical duration | Output that closes the phase |
|---|---|---|
| Site survey and engineering review | Illustrative allowance of 1-2 weeks | Survey report, groundwater findings and submittals |
| Pit and tank work | Illustrative allowance of 2-4 weeks | Pit structure, drainage and waterproofing inspected |
| Hoistway and jack installation | Illustrative allowance of 2-3 weeks | Jack set, aligned and anchored |
| Power and pressure piping | Illustrative allowance of 1-2 weeks | Pump unit, tank and piping pressure-tested |
| Controls and safety wiring | Illustrative allowance of 1-2 weeks | Controls and door-lock circuits verified |
| Testing and inspection | Illustrative allowance of 1-2 weeks | Acceptance tests passed and inspection signed off |
| Permit approval, coordinated alongside planning | Jurisdiction's review and issuance process | Permit issued before regulated alteration work starts |
The phase sequence is easier to follow when construction and equipment activities are shown together.
Schedule Around Readiness, Not Delivery Alone
Pit and hoistway readiness can control when elevator crews can work productively. Delivered components don't help if the pit is wet, structural openings are unfinished, or permanent power isn't available.
Hydraulic elevators have a substantial low-rise history: an independent technical review published by Blain records hydraulic production overtaking traction production in 1973, with hydraulics accounting for approximately 70% of units sold for new U.S. buildings by 1986.
Ask where each phase starts and ends, what closes it, and who confirms the next crew can proceed.
Weather, material lead times, unexpected excavation conditions, and inspector availability belong in the schedule discussion before you sign.
How Hydraulic Elevators Work and When to Choose Them
A hydraulic elevator works a little like a bicycle pump in reverse. Instead of your hand pushing a piston to move air, a powered pump moves oil to extend a piston and lift the elevator car. The analogy explains the movement, but the elevator uses a controlled hydraulic circuit with dedicated safety devices.
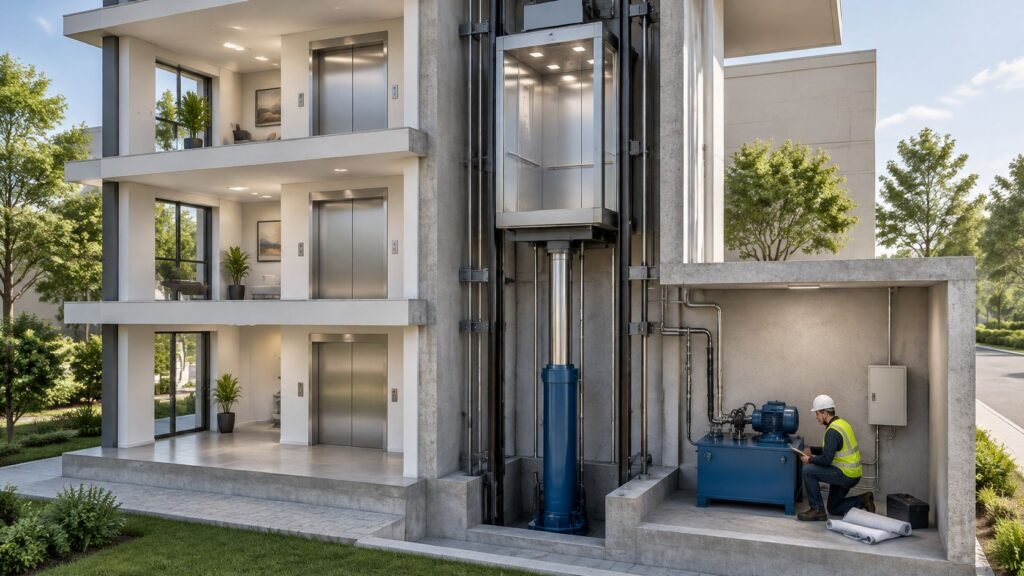
Start with the jack, the cylinder-and-piston assembly that supplies the lifting force. The pump unit and tank supply and store hydraulic oil, while pressure piping connects the power unit to the jack. The control system coordinates travel, leveling, and doors, and overspeed and shutoff valves provide protection and isolation.
During upward travel, the pump pushes oil into the cylinder. During descent, a controlled valve releases oil back to the tank while gravity lowers the car. The pump doesn't need to pull the car downward, although controls, lighting, and other electrical equipment still need power.
Match the System to the Building's Workload
Hydraulic equipment suits shorter buildings because it doesn't require a traction drive machine above the car. That can simplify the upper-hoistway arrangement, but it doesn't eliminate required overhead clearances or the need for accessible equipment space.
The operating tradeoff matters. The American Council for an Energy-Efficient Economy's elevator analysis estimated that hydraulic elevators used roughly three times as much energy as traction elevators for the same lift and traffic; its simulation of a lightly loaded low-rise hydraulic unit making 100,000 starts annually estimated approximately 1,900 kWh per year.
That historical analysis also reported that at least two-thirds of installations serving approximately seven stories or fewer were hydraulic. That describes the installations studied, not a universal design limit or a current market-share claim.
Hydraulic versus traction at a glance
| Factor | Hydraulic | Traction |
|---|---|---|
| Practical travel range | Low-rise applications, with approved travel determined by design | Taller buildings and higher travel |
| Energy use for the same lift and traffic | Higher in the historical analysis | Lower in the historical analysis |
| Initial installation cost | Generally lower | Generally higher |
| Overhead machinery | No overhead traction machine; pump and tank need equipment space | Machine location follows the selected machine-room or machine-room-less design |
| Pit depth | Established by approved equipment layout and site design | Established by equipment clearances, buffers, and approved layout |
| Best fit | Short travel, moderate traffic, constrained initial budget | Greater travel, heavy traffic, or strong operating-energy priorities |
Think Beyond the Stop Count
A small municipal office and a busy healthcare building may have similar travel distances but very different demands. Consider peak arrivals, carts or beds, accessibility, expected loading, and how long occupants can reasonably wait.
Use those requirements to evaluate hydraulic elevator configurations, rather than selecting a system from floor count alone. Also compare the available pit, equipment-room location, structural implications, and maintenance access.
Choose hydraulic for short travel and moderate traffic when the site supports it. Evaluate traction closely when the building grows taller, traffic intensifies, or operating energy becomes a leading budget concern.
Site Survey and Pit Risks to Settle First
During a renovation, excavation may reveal groundwater, buried utilities, or a foundation that differs from the drawings. If those conditions are left unresolved, the project can face redesign, extra work, or delays before the elevator equipment is even installed. The site survey should establish what is below and around the proposed pit, not just measure the opening.
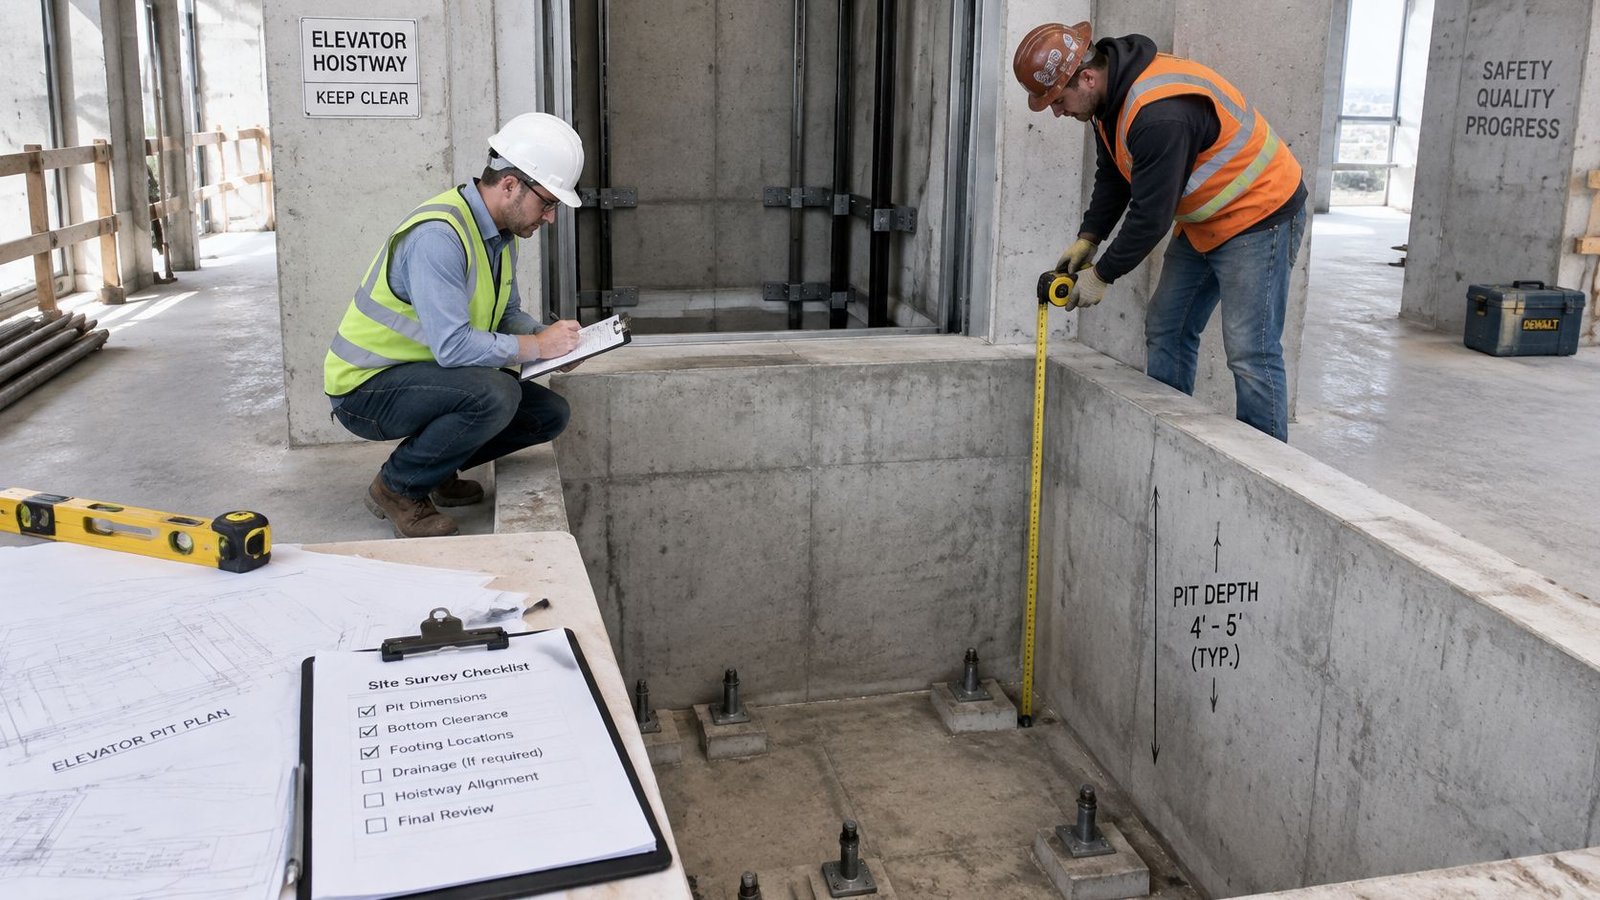
Pit depth is set by the approved elevator layout, not by a general rule of thumb. Confirm the required dimensions with the equipment manufacturer and project engineer before excavation. The approved design must also account for the building structure, the jack arrangement, and the access needed to inspect and maintain the pit.
Resolve Water and Flood Exposure Before Excavation
First, establish who is responsible for reviewing soil conditions and groundwater. If the proposed pit is below the water table, the engineer should address water pressure, temporary dewatering during construction, waterproofing, and the permanent drainage arrangement. Each decision affects the concrete work and the long-term protection of the elevator equipment.
Flood exposure can also affect where the controls, pump, and tank belong. Follow the approved flood-protection design for equipment placement, hydraulic-line protection, and the height of critical jack seals. For help identifying the questions to resolve, review this elevator-pit waterproofing assessment.
A sump is not a complete plan by itself. The plumbing and environmental review must distinguish groundwater from liquid that may contain oil, then specify an approved way to discharge or collect it.
Budget warning: A bid that leaves waterproofing unresolved may exclude work the project will still need.
In Michigan and Ohio, investigate seasonal groundwater, freeze-thaw exposure, older foundations, and potential brownfield constraints. Excavation and disposal requirements can differ between an older industrial property and a new building on an uncomplicated site, so settle those conditions before comparing bids.
Request a Written Pit-Readiness Checklist
Before approving excavation, ask the project team to document:
- Ground conditions: Who reviews soils, groundwater, buried utilities, and possible contamination.
- Structural design: Approved pit dimensions, foundation connections, jack arrangement, and excavation support.
- Water management: Waterproofing details, separate groundwater collection where needed, and the approved sump-discharge route.
- Environmental protection: Oil-water separation or another approved containment method.
- Safe access: Ladder location and adequate room to inspect drains, seals, and piping.
- Local approval: The authority having jurisdiction and the relevant building, plumbing, floodplain, and elevator reviewers.
Use the checklist alongside the site drawings. Resolve unclear responsibilities before the equipment order fixes the layout or excavation begins. The owner should receive a written division of work among the elevator contractor, concrete contractor, and plumber. Without it, each may assume another party has included the same pit work, leaving a gap that surfaces after construction starts.
Permits, Code Rules and Recurring Tests in Michigan and Ohio
Elevator installation follows a code framework, not a single rule. The equipment category, adopted standards, state oversight, and local construction approvals all matter.
Michigan's Elevator Section inspects new installations and alterations, conducts annual safety inspections, and confirms required permits. Its elevator permit guidance identifies ASME A17.1, A18.1, and A90.1 and requires installation, alteration, maintenance, repair, inspection, adjustment, and testing by a licensed elevator journeyperson.
Michigan and Ohio Requirements Compared
| Requirement | Michigan | Ohio |
|---|---|---|
| Governing code framework | A17.1 for elevators and escalators, A18.1 for platform and stairway chairlifts, A90.1 for belt manlifts | Adopted ASME elevator standards |
| Installation oversight | Elevator Section reviews installations, alterations, and permits | Confirm installation approval with the responsible Ohio authority |
| Who may perform the work | Licensed elevator journeyperson | Confirm applicable state licensing and authorization |
| Recurring safety test interval | Applicable car and counterweight safeties and governors tested within the state interval | Periodic tests, including the required full-load test |
| Test report handling | Testing firm submits certification and results to the department | Report available to owner on inspection day |
| Annual inspection | State annual safety inspection program | Confirm the device's inspection schedule with the authority |
Michigan's maintenance inspection rule specifies applicable safety and governor tests at intervals of no more than 12 months, with certification submitted to the department. Apply component-specific requirements to the actual elevator configuration.
Ohio's elevator inspection rule requires at least one full-load safety test every five years under ASME A17.1 Section 8.6.4.20, with the report available to the owner on the inspection date.
Confirm the permit path before excavation, and put recurring obligations into the building's elevator code requirements plan.
Step-by-Step Installation From Pit to Power
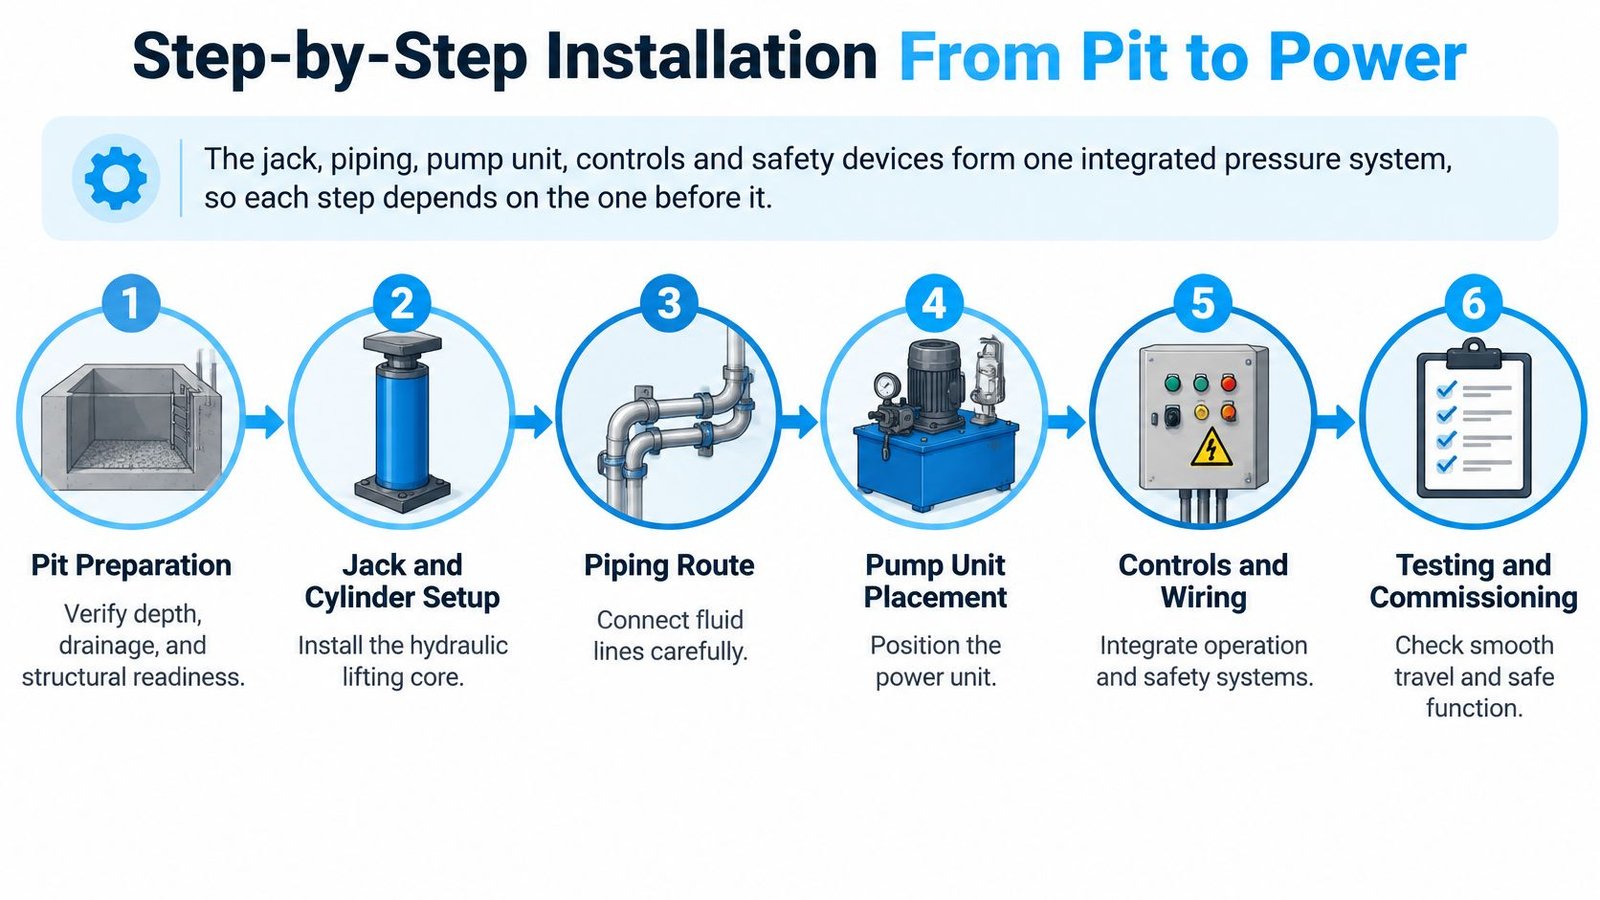
The jack, piping, pump unit, controls, and safety devices form an integrated pressure system. Installing each component correctly isn't enough if their ratings, settings, or locations don't agree. Think of the system like a chain of pressure-rated connections, each dependent on the design around it.
This is a coordination sequence for owners and general contractors, not a procedure for unqualified installation. Licensed elevator personnel and the responsible design professionals must carry out and verify the work.
The flow graphic shows how the major assemblies connect.
Establish the Design and Lifting Assembly
Confirm the submittals before procurement. Check rated load, travel, speed, cylinder arrangement, working pressure, relief-valve setting, pipe sizing, valve locations, and required clearances against coordinated drawings. Close this step with approved documents that agree across the elevator, structural, and electrical scopes.
Set and protect the jack. A direct-bore design needs the specified steel casing, protective PVC enclosure, bottom support, backfill, alignment, and anchorage so the moving piston cannot contact its surrounding casing. Verify alignment and protection before concealing work, and distinguish the jack bore beneath the pit from the occupied pit itself.
Complete the pit's permanent systems. Finish waterproofing, drainage, approved oil separation or containment, and ladder access without obstructing elevator components. Close the phase with a dry, clean pit and documented checks of the drainage route and accessible service points.
Install the guides, rails, and car frame. Set brackets and rails to the approved layout, check alignment with appropriate survey tools, and verify structural attachments before loading the assembly. Record the required measurements so the crew doesn't discover an alignment conflict after installing the cab and doors.
Connect the Pressure System and Controls
Place the power unit and install pressure piping. Keep the tank, pump, valves, and service points accessible, and protect piping along its route. Virginia's public-sector elevator specifications call for an overspeed valve within 12 inches of the jack and full-flow, quarter-turn manual shutoff valves in the machine room and pit; verify those locations when that specification governs the project.
Connect power, controls, and safety devices. Qualified personnel coordinate the feeder, disconnects, grounding, controller, door interlocks, limits, and other specified safety circuits, then fill the system with the approved fluid. The University of Houston hydraulic elevator specification requires Grade 32 hydraulic oil with a viscosity index above 180 and limits its hydraulic applications to four stops, illustrating why owner standards must be confirmed rather than treated as universal rules.
Verify pressure integrity before powered travel. Complete the manufacturer's approved pressure and leak-check procedure, document working pressure and relief settings, and resolve leakage or incorrect connections before car movement. Then release the system for controlled startup and the remaining operational tests.
Oil viscosity affects cold-start response and valve behavior. Pipe and valve selection also affect pressure loss and leveling, so substituting a convenient fluid or fitting can change how the system performs.
Close Each Step With Evidence
A crew's verbal confirmation isn't the same as an inspection record. Keep alignment checks, concealed-work photographs, approved changes, pressure-test results, and component identification with the project documents.
If a component arrives with a different rating or connection arrangement, stop and reconcile it with the approved design. Field improvisation at a pressure connection can create problems that won't be obvious from a smooth unloaded ride.
Testing, Commissioning and Maintenance Handoff
Acceptance begins the ongoing testing obligation. A successful ride and inspection approval don't tell the next technician what fluid is installed, where a concealed line runs, or why a valve was set a particular way.
Require commissioning records for working pressure, relief-valve setting, test-gauge access, and the tank identification information specified for the installation. Also document fluid type and volume, leak-detection access, containment and disposal procedures, and completion of pressure testing.
Require a Usable Handoff Package
The University of Missouri conveying-systems standards provide an owner-specification reference for coordinating equipment and long-term service requirements. Your turnover package should contain:
- As-built schematic: Hydraulic routing, isolation points, and approved field changes.
- Fluid record: Specification, installed volume, and compatible replacement information.
- Jack details: Cylinder identification, packing information, and inspection access.
- Power-unit baseline: Pump settings, working pressure, and relief settings.
- Test results: Doors, interlocks, safety devices, leveling, and accessibility checks.
- Pit verification: Drainage operation, containment arrangement, and housekeeping.
- Emergency functions: Fire-service operation and emergency communication results.
- Future obligations: An equipment-specific inspection and testing calendar confirmed with the authority.
Make the Handoff a Working Meeting
Have the maintenance provider and facility team review the records before the installer leaves. Demonstrate equipment access, emergency contacts, normal shutdown procedures, and the location of isolation devices without encouraging unqualified staff to adjust them.
Turnover standard: The next qualified technician should be able to identify the equipment and its baseline settings without reconstructing the installation.
Inaccessible components, undocumented adjustments, and restricted controls can make a cheap installation difficult to maintain. Resolve those issues before final payment, not during the first extended outage.
Costs, Financing and Modernization Paths
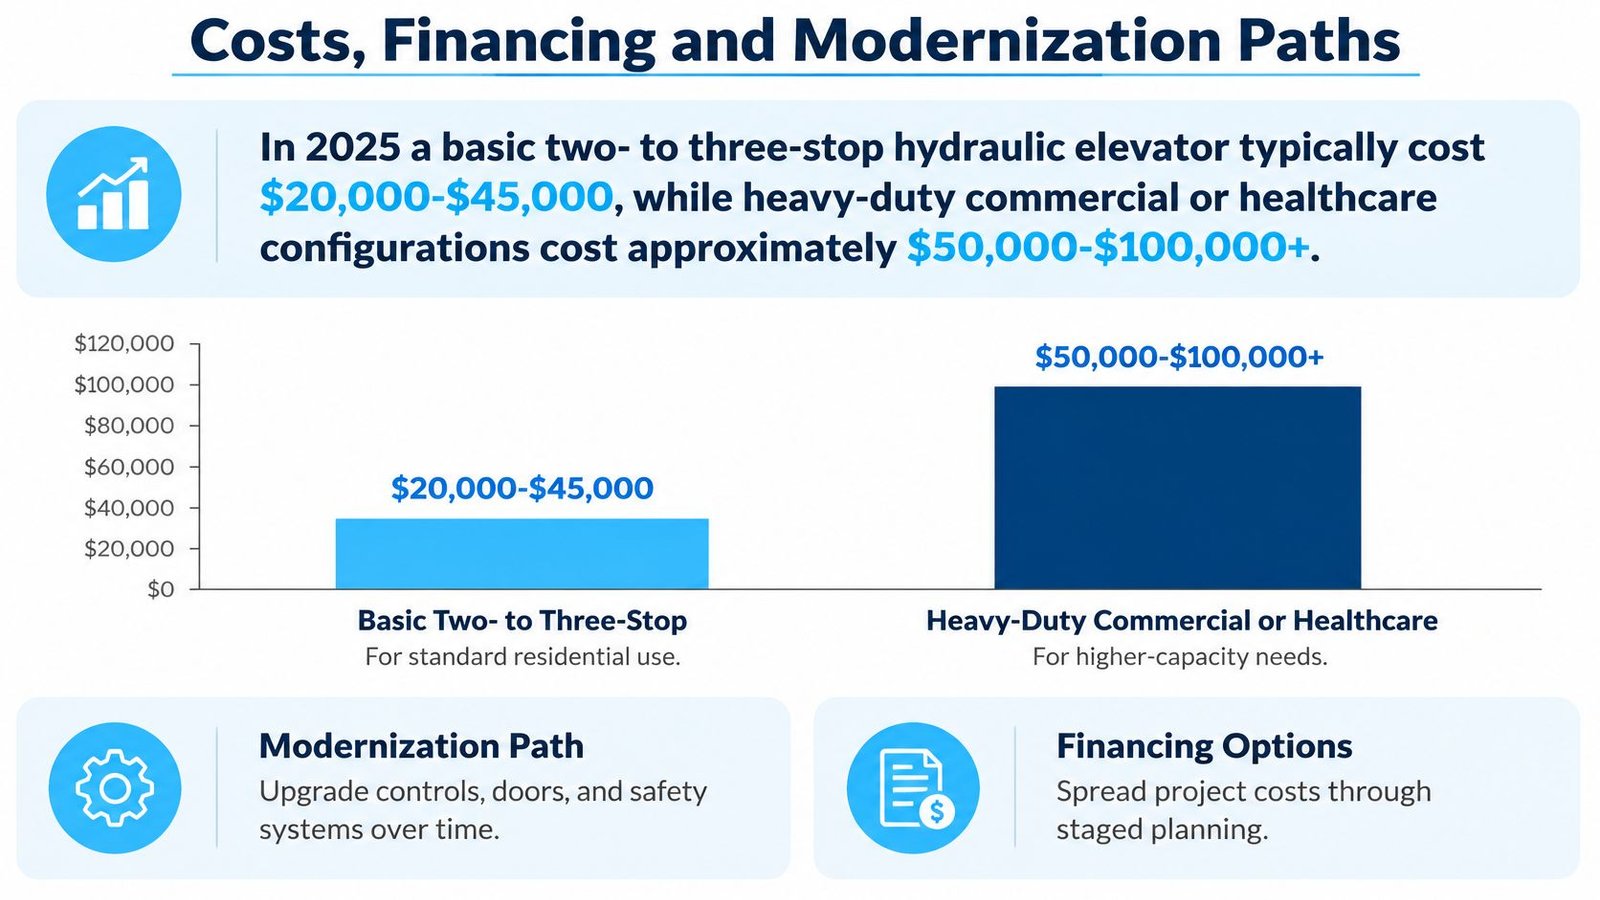
A basic two- to three-stop hydraulic elevator typically costs $20,000-$45,000 in 2025. A heavy-duty commercial or healthcare configuration costs approximately $60,000-$120,000, according to Dataintelo's hydraulic elevator industry report. These are published configuration benchmarks, not a complete installed-project quote for a specific building.
A proposal is easier to compare when its boundaries are clear. Confirm whether it covers structural work, excavation, permits, electrical work, finishes, testing, and turnover, or only the elevator contractor's package. Site work can shift the budget even when the selected equipment stays the same.
Separate Equipment From Building Work
Rated load, stop count, door arrangements, cab finishes, power-unit selection, and controls shape the equipment proposal. Groundwater, flood exposure, foundation conditions, and the route through an occupied building shape construction costs. Treat these as separate parts of the budget, much like buying a machine separately from preparing the room that must hold it.
Hydraulic elevator cost bands
| Configuration or component | Typical cost | Notes |
|---|---|---|
| Basic two- to three-stop hydraulic elevator | $20,000-$45,000 (2025) | Low-rise residential and light-commercial planning reference |
| Heavy-duty commercial or healthcare configuration | Approximately $60,000-$120,000 | Higher rated load and traffic demands |
| Pit waterproofing and drainage | Site-specific engineered quotation | Price groundwater control, discharge, and flood protection separately |
The chart compares basic residential models with heavier commercial configurations. Use it alongside the written project scope, since pit and site requirements need their own pricing.
Budget for Renewal Without Assuming Full Replacement
Modernization may be staged if the equipment's condition and compatibility allow it. A leaking packing assembly, deteriorated jack, worn power unit, and obsolete controller point to different needs, so identify the actual limitation before approving wholesale replacement.
For example, a building may have a serviceable car and guide system but unreliable controls and aging door equipment. An engineered modernization can focus on those assemblies while checking that retained components remain suitable. The distinction is like repairing a machine's control panel rather than replacing the entire machine, provided the remaining parts are fit for continued use.
- Mechanical scope: Identify jack, packing, pump, tank, and valve condition.
- Electrical scope: Review controller support, wiring, fixtures, and safety interfaces.
- Building scope: Preserve access for future removal and replacement.
- Operating budget: Compare maintenance, electricity, inspections, and expected renewal needs.
Financing can spread approved installation or modernization costs across a payment schedule. Compare total repayment, fees, payment timing, and the work included, rather than judging affordability by the monthly payment alone.
Set aside funds for pit and site work before finalizing the equipment budget. Otherwise, the visible elevator may use up available funds while the construction needed to make it usable remains unresolved.
Crane Elevator Service Coverage in Michigan and Ohio
A building owner planning a hydraulic elevator should consider who can maintain it after construction and respond when service is needed. At Crane Elevator Company, we serve Detroit, Lansing, Ann Arbor, Flint, Kalamazoo, and surrounding Michigan communities, including Birmingham. We also serve Ohio customers in Toledo, Perrysburg, and nearby towns.
Crane Elevator Company is family-owned and operated, with over 25 years of elevator-industry experience. Its technicians work on older equipment as well as newer installations, helping owners account for long-term service needs when planning a project.
Keep Responsibility Clear Across the Equipment Portfolio
Crane specializes in maintenance, repair, and modernization for passenger, service, freight, and residential elevators, as well as wheelchair lifts, material lifts, and dumbwaiters. Its expertise also covers hydraulic and traction elevators, drum machines, preventive maintenance, state testing and inspections, major and minor repairs, and violation corrections. For hydraulic systems, services include jack, packing, and tank or power-unit replacement.
A property with several types of equipment can coordinate service with one provider. For example, a school may have a passenger elevator and a wheelchair lift, while an industrial building may rely on elevators and material lifts. Crane works on all makes and models and provides non-proprietary modernization upgrades, so any qualified service provider can maintain the upgraded systems.
Build the Service Calendar Before Handover
During planning, gather the building's service history, open inspection items, and available test records. Sharing them helps the maintenance provider understand the equipment and plan the transition from construction to ongoing service. Different devices may have different maintenance and testing needs.
For an occupied property, decide who receives service reports and can approve corrective work. A clear owner-side contact helps prevent inspection findings from waiting between the facility, property-management, and construction teams.
Crane's preventive maintenance includes cleaning machine rooms, pits, and car tops, along with COP and PI bulb replacements. The aim is a completed installation the building team can operate, document, and maintain.
Confirm Your Pit, Permit and Budget Plan Next
Is the project ready to sign, or does the proposal still leave major decisions for construction? A ready project has named responsibilities, approved design assumptions, and a cost breakdown that separates the elevator from the building work.
Use the site-readiness and turnover requirements as contract attachments. Then resolve the commercial and scheduling details that can otherwise fall between trades.
Put These Commitments in Writing
- Named site reviewer: Identify who owns geotechnical, groundwater, and contamination review, and confirm the authority having jurisdiction.
- Permit path: Show permit review and issuance separately from excavation and regulated installation work.
- Design basis: Require coordinated submittals for rated load, working pressure, relief settings, and equipment arrangement.
- Phase dates: State planned starts, finishes, dependencies, and the evidence needed to close each phase.
- Separate site pricing: Break out pit construction, waterproofing, drainage, discharge provisions, and flood protection.
- Maintainability: Preserve access to the jack, packing, power unit, controls, and isolation points.
Compare Complete Plans, Not Bottom Lines
Check exclusions before comparing bids. If one proposal includes drainage verification and another assigns it to the owner without a price, those totals aren't directly comparable.
Also establish how concealed conditions and scope changes will be approved. Require a written description, cost, and schedule effect before additional work proceeds whenever practical.
Prepare the building's stop count, rated load, site details, drawings, and inspection history. Ask for a written schedule and itemized cost breakdown, then review those documents with the people responsible for construction and future maintenance before authorizing work.
Crane Elevator Company offers hydraulic elevator expertise, commercial elevator and modernization financing, and a no-extra-charge second opinion on an existing or ongoing elevator problem, including a visit and solution plan. Visit Crane Elevator Company with your building details and inspection history to start a written pit, permit, schedule, and budget discussion.