
A lot of building owners notice the elevator floor when tenants start noticing it first. The pattern is familiar. Corners curl, seams open up, the finish looks dated, and suddenly the cab feels older than the rest of the property.
That's where many people make the wrong call. They treat the floor like a quick flooring swap, when in practice elevator floor replacement is tied to code, weight, leveling, safety, and the service life of the cab itself. In a Michigan commercial building, the wrong material or the wrong installer can turn a simple refresh into a failed inspection, repeated shutdowns, or rework that costs more than doing it properly the first time.
When Your Elevator Floor Needs More Than a Polish
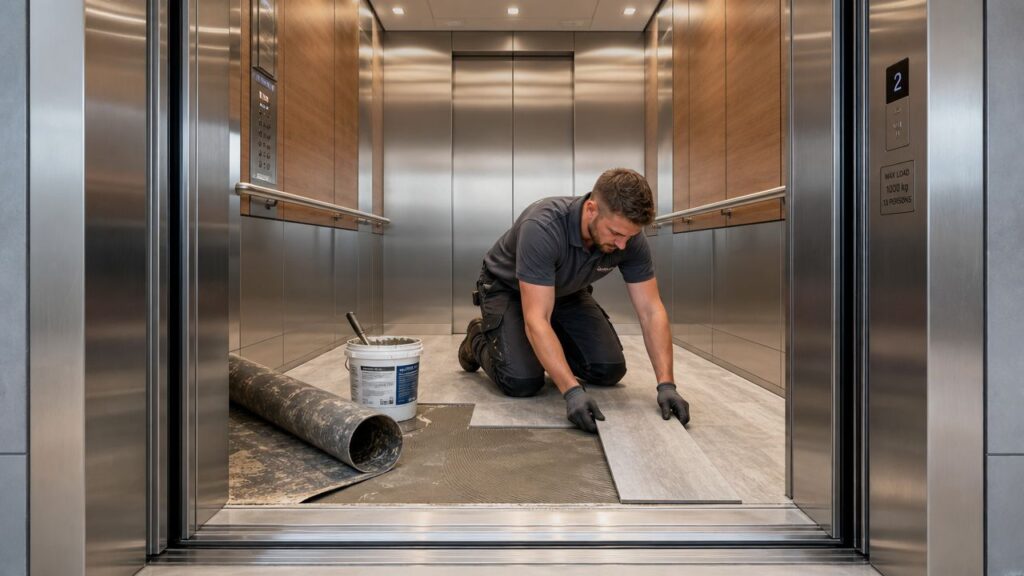
A worn elevator floor usually starts as a cosmetic complaint. Property managers in Detroit, Ann Arbor, Lansing, and other Southern Michigan markets hear that the cab looks tired, doesn't match the lobby, or feels neglected compared with the rest of the building. That concern is valid, but the visible wear is often only the top layer of the problem.
Under the finished surface, the subfloor may be soft, uneven, contaminated by old adhesive, or holding signs of moisture. If the car isn't landing level, the floor can show damage faster because traffic hits the same edge over and over. If the elevator has had water exposure, the floor can become the first part of the cab to show it. Building owners dealing with leaks or moisture issues should also think about the broader risks described in this guide on elevator water damage.
What the floor is really telling you
A damaged floor can point to several different conditions:
- Surface wear from traffic: Scuffs, gouges, and peeling often come from carts, wet shoes, winter salt, and constant daily use.
- Subfloor trouble underneath: Soft spots or movement underfoot usually mean the issue isn't just the finish material.
- Cab aging: Older interiors often reach a stage where replacing one component exposes the age of the rest.
- Operational issues: Poor leveling at the landing can increase wear and create a transition that feels wrong to passengers.
Practical rule: If the floor looks bad but also feels uneven, loose, or soft, don't price it as a finish-only job.
In Michigan, winter conditions add another layer. Snow, slush, grit, and salt get tracked into elevator cabs for months. That matters because some finish materials handle moisture, grit, and frequent cleaning much better than others.
Why owners should think beyond appearance
The floor affects how the cab performs and how the property reads to tenants. But it also affects the long-term cost of ownership. A cheap material that looks acceptable on day one can create more shutdowns, more edge failures, and more labor later. A heavy material can create compliance issues before the cab ever goes back into service.
The right approach is to treat elevator floor replacement as a building systems decision. That means checking the structure below it, understanding what the car can carry, and choosing materials that fit the elevator, not just the design board.
Initial Assessment and Michigan Code Compliance
Before anyone talks about colors or patterns, the elevator needs a real assessment. That starts with the existing floor assembly, but it doesn't end there. A proper review looks at the finished floor, the plywood subfloor, the cab sill transition, the leveling condition of the elevator, and the effect a new floor will have on the car's total operating weight.
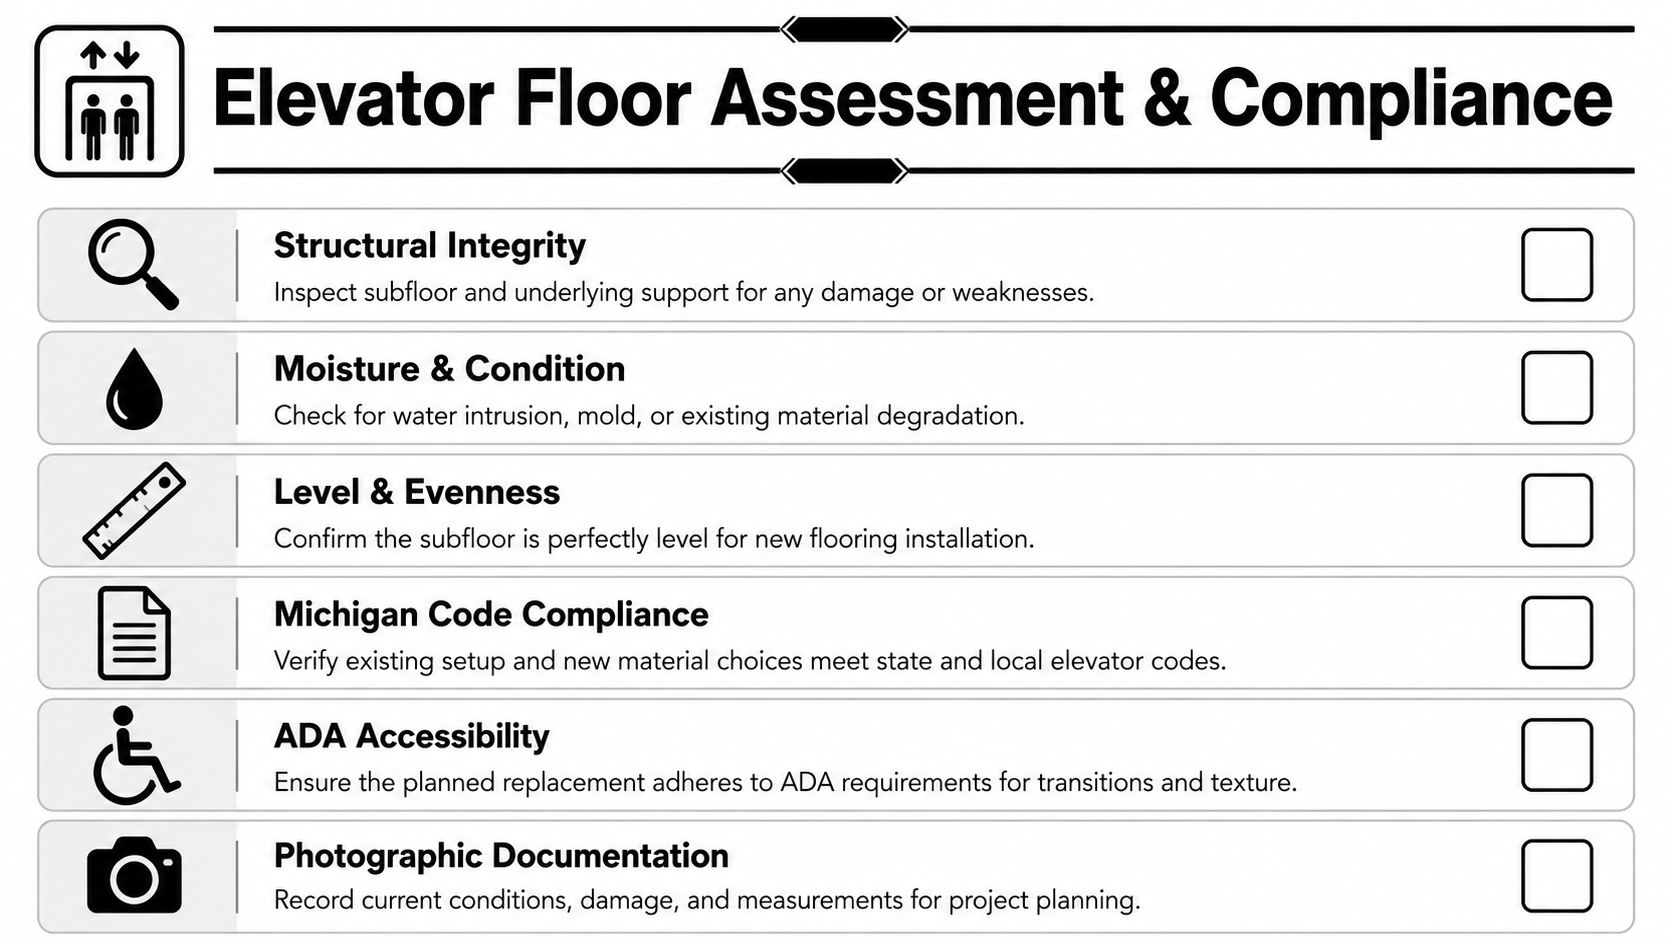
What gets inspected first
A solid field assessment usually includes:
- Subfloor condition: The installer should expose enough of the assembly to identify rot, delamination, movement, or prior patching.
- Moisture signs: Water staining, mold, corrosion at edges, or adhesive breakdown can change the whole job scope.
- Level and transition points: The new floor has to work with the sill and landing interface, not just sit flat in the middle.
- Current floor build-up: Thickness matters. So does every layer that was added by a previous contractor.
- Cab interior context: If wall panels, toe guards, saddles, or trim are already failing, replacing only the floor may create rework later.
Owners who want a clearer sense of the regulatory side should review the broader elevator code requirements that affect modernization work in Michigan.
The weight rule that changes material choices
One of the most important code-related constraints is weight. In passenger elevators, a cited code-compliance rule limits cab modifications so the change in the car's weight does not exceed 5% of the elevator's rated load. That's why floor replacement often requires engineering review before installation, especially in older equipment, as noted in this code compliance overview for passenger elevator flooring.
That rule catches owners off guard because flooring sounds minor. It isn't, at least not in an elevator. New underlayment, leveling compound, adhesive build-up, and finish material all add weight. Even a modest change in assembly can force recalculation and review.
The floor isn't judged only by how it looks. It's judged by what it adds to the car and how it affects safe operation.
The same guidance notes that lifts older than 15 years are often candidates for upgrade evaluation, and replacement may be necessary after about 20 years depending on condition, which is another reason the floor should be assessed as part of the whole cab and not as an isolated patch job.
Common compliance mistakes
The problems I see most often are simple in concept and expensive in practice:
- A contractor prices a decorative finish without checking the existing car weight.
- Someone assumes the old subfloor is sound because the visible surface is the only damaged layer.
- The new floor is selected before anyone confirms final thickness and sill transition.
- The project gets treated like lobby flooring instead of elevator work.
If you want a clean project, assessment comes first. Material selection comes second. Installation comes after the engineering and code side is settled.
Choosing the Right Elevator Flooring Materials
Material selection is where owners often get pulled toward appearance first. In elevator work, that's backward. Start with weight, durability, slip resistance, and maintenance, then narrow the finish options that fit those requirements.
Industry guidance warns against heavy stone or ornate floor assemblies, while modern passenger-cab upgrades commonly use durable materials such as luxury vinyl tile or rubber, paired with final testing and code review after installation, as discussed in this guide to elevator modernization materials and upgrades.
What works in a commercial cab
Some materials hold up because they solve practical problems. Others keep getting specified because they look good in a sample book.
Here's the short version:
- Luxury vinyl tile: A common choice when owners want a clean appearance, lower added weight, and easier replacement of individual sections if damage occurs.
- Rubber flooring: Strong option for healthcare, education, municipal, and high-traffic environments where slip resistance and resilience matter more than a decorative look.
- Resinous systems: Useful when the floor needs a continuous finish and the subfloor can be prepared correctly. Prep quality matters more here than owners usually expect.
- Heavy stone or ornate assemblies: Usually the wrong direction unless the cab was designed for that load and the full engineering review supports it.
Elevator Flooring Material Comparison
| Material | Durability | Weight | Maintenance | Typical Cost |
|---|---|---|---|---|
| Luxury vinyl tile | Good for many passenger applications and easy to refresh in sections | Generally lighter than stone-based assemblies | Straightforward cleaning and routine care | Varies by product, prep needs, and cab conditions |
| Rubber | Very durable in high-traffic settings and handles abuse well | Often a practical low-added-weight choice | Easy to maintain, good for wet-weather traffic | Varies by thickness, finish, and installation scope |
| Resinous flooring system | Durable when the subfloor is properly repaired and leveled | Can be a practical option depending on system build-up | Seamless finish can simplify cleaning | Varies with prep, cure time, and coating system |
| Stone or ornate multi-layer assembly | Can wear well physically but creates risk in elevator applications | Heavy, often a poor fit for code and weight limits | Maintenance depends on finish and joints | Often higher once engineering and labor are considered |
The table doesn't give a universal winner because the right answer depends on the elevator and the building. A hospital in Flint won't prioritize the same finish as a Class A office in Troy. A school in Kalamazoo may care more about abuse resistance than design detail.
How to decide without overbuying
A smart selection process filters options through these questions:
- Will the material keep the cab within acceptable weight change?
- Will it stay safe in wet Michigan conditions?
- Can your maintenance staff clean it without special procedures?
- If one section gets damaged, can it be repaired cleanly?
- Will this floor still make sense if the rest of the cab is refreshed later?
For owners comparing broader upgrade options, elevator modernization services can help frame whether flooring should be handled alone or bundled with other cab work.
A floor that looks impressive in a showroom can be the wrong choice the minute it adds too much weight or creates a slippery cab in February.
Materials that usually disappoint
The problem materials usually share one trait. They ask too much from the elevator.
Tile, thick decorative builds, and heavy stone-inspired assemblies can create trouble with weight, rigidity, cracking, edge transitions, or future serviceability. Even when they can be installed, they may not be the most practical long-term choice. In elevator cabs, simpler often performs better.
Budgeting Your Project and Selecting a Contractor
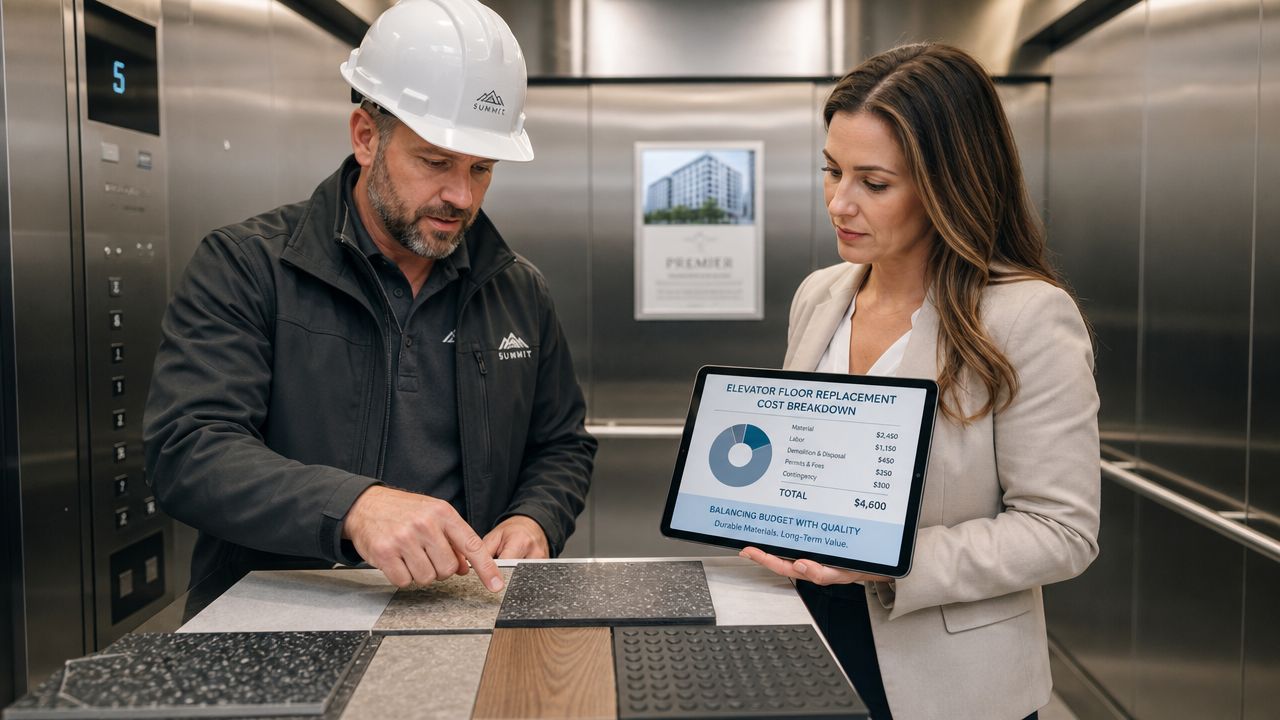
A floor replacement budget can look reasonable on paper and still miss the costs that matter most once the cab is opened up. In Michigan, the smarter budget is the one that accounts for downtime, code-related corrections, and the condition of the subfloor, not just the finish you see at the end.
Elevator floor replacement often includes more than new material and labor. The job may require removal of old tile or vinyl, adhesive cleanup, plywood repair or replacement, leveling work, trim adjustment, shutdown coordination, and final review before the car is placed back into service. If those items are missing from the proposal, the low number usually does not stay low for long.
Why the cheapest bid often gets expensive later
Elevator flooring sits inside a regulated piece of equipment, not a standard room finish. That distinction affects who should do the work and how the project should be priced.
A general flooring company may install attractive finishes every day and still miss elevator-specific issues such as cab weight change, sill height, door clearance, trim fit, shutdown sequencing, and the inspections or coordination needed before the unit returns to use. Those misses turn into change orders, added downtime, or a floor that has to be redone because the installation created a service or compliance problem.
I have seen owners save a little on the front end, then spend far more correcting details that should have been identified before demolition started. That is why contractor selection is an asset management decision, not a shopping exercise.
What to ask before you sign
A good proposal should answer practical questions clearly:
- Who inspects the subfloor: The scope should say who evaluates damage after removal and who approves the repair.
- How is cab weight and floor height reviewed: The contractor should be able to explain how the new assembly affects operation, clearances, and code compliance.
- What is included if the plywood is deteriorated: Owners need a defined process for repair pricing and approval.
- Who handles shutdown planning and return-to-service coordination: That should be assigned before the work begins.
- Are the materials serviceable later: Long-term ownership is easier when repairs do not depend on hard-to-match proprietary products.
One option building owners in Lower Michigan consider is Crane Elevator Company, a family-owned contractor that handles inspections, repairs, modernization work, and non-proprietary service across communities including Detroit, Ann Arbor, Lansing, Flint, and Kalamazoo.
If a bidder talks only about finish samples and cannot explain code, shutdown planning, or subfloor repair, they are pricing the visible problem, not the underlying one.
What a better budget looks like
A workable budget includes a contingency for concealed conditions under the existing floor. It also puts a value on scheduling. In an office building, school, senior living property, or medical facility, reducing elevator downtime has an operating cost impact whether it appears on the quote or not.
The strongest proposals are usually specific. They describe demolition, substrate preparation, material installation, trim work, cleanup, and the process for handling hidden damage. They also make clear who is responsible for code-related review in Michigan and who signs off on the completed work.
That is where long-term value shows up. A qualified elevator contractor helps you avoid premature wear, repeat shutdowns, and compliance issues that cost more than the original floor ever did.
The Replacement Process From Prep to Final Sign-Off
Owners usually want to know what the actual job looks like on site and how long the elevator will be out of service. The honest answer is that scope drives timing, but the sequence should always be disciplined.
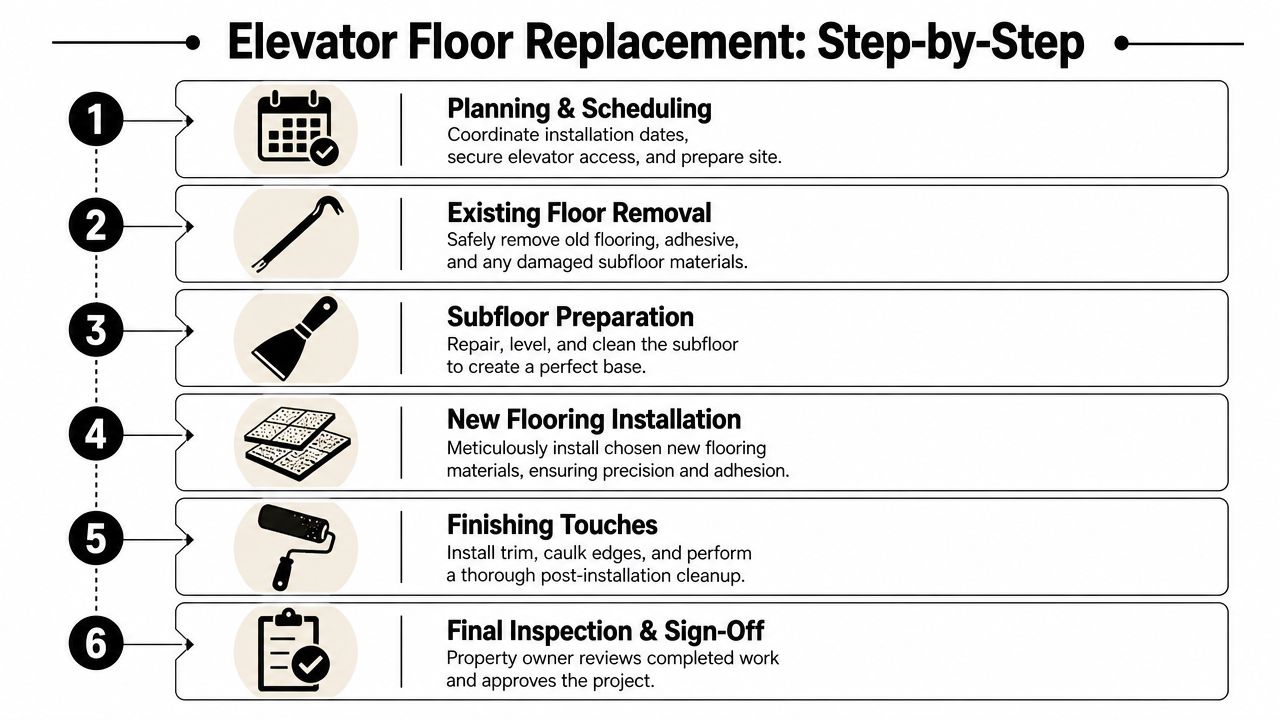
A documented method for elevator floor replacement describes the workflow as removing existing tile or linoleum, exposing and inspecting the plywood sub-floor, cleaning and sanding it, then installing a screed or leveling layer with an overnight cure before the final resin or finish coat. That same method reports a final flood coat curing for 48 hours and notes that many floors were completed over a weekend to reduce interruption, as shown in this documented elevator floor repair workflow.
Step one and step two
The first phase is planning. The contractor coordinates access, secures shutdown windows, protects adjacent finishes, and confirms who has authority for sign-off. In occupied buildings, weekend scheduling often makes sense because it reduces the impact on tenants and visitors.
Then the old floor comes out. During this process, hidden conditions often become apparent. Adhesive build-up, unsupported patches, damaged plywood, rust staining near the sill, and uneven transitions all become visible after demolition.
Step three and step four
Once the floor is open, the subfloor gets inspected, cleaned, and prepared. If it isn't stable and level, the finish layer won't save the job. The best-looking material will still fail if it's installed over a weak or dirty base.
After prep, the installer applies the leveling layer or screed if needed and allows it to cure. That cure time isn't idle time. It's what allows the new finish to sit on a sound, predictable surface rather than trapping problems underneath.
Step five and step six
With the base ready, the finish material goes in. Depending on the system, that may mean placing tile, rolling in sheet or rubber material, or applying a resin finish coat. Edges, transitions, trim details, and adhesion work matter here because those are the areas that usually fail first in service.
Once the surface work is complete, the floor must cure before traffic returns. Rushing this stage is one of the easiest ways to ruin a good installation.
Don't judge the schedule by installation time alone. Cure time is part of the job, not downtime caused by delay.
The final phase is review and sign-off. The contractor should check finish quality, edge details, transitions, and general cleanliness before the elevator returns to regular use. On a properly run project, the owner isn't surprised by the end result because the scope, materials, and sequencing were clear from the start.
What owners can do to help the project go smoothly
A few owner-side decisions make a noticeable difference:
- Choose one point of contact: It prevents scheduling confusion and approval delays.
- Confirm access windows early: Medical, school, and municipal buildings often have harder shutdown constraints.
- Approve materials before shutdown: Last-minute substitutions create problems.
- Tell the contractor about known leaks or leveling issues: Hidden history helps avoid field surprises.
A smooth elevator floor replacement job usually looks uneventful from the outside. That's a good sign. It means the planning was done before the first tile came up.
Post-Installation Care and Long-Term Value
A new floor doesn't stay new on its own. The owners who get the best service life out of elevator floor replacement usually follow simple maintenance habits and tie the floor into a broader capital plan.
Industry guidance notes that elevator cab interiors may have a useful life of about 15 years, while many elevator mechanical components fall in the 20–25 year range. A worn floor can signal that the cab interior is nearing refresh, but not necessarily that the full mechanical system needs replacement, according to this discussion of elevator repair and replacement timing.
Daily care that protects the investment
Floor maintenance doesn't need to be complicated, but it does need to be consistent.
- Remove grit quickly: Dirt and winter salt act like sandpaper under foot traffic and cart wheels.
- Use the right cleaner: Match the cleaning product to the installed material instead of using a one-chemical-for-everything approach.
- Watch the edges: Seams, transitions, and perimeter trim tell you early if something is starting to fail.
- Report water immediately: A small leak can damage a new floor long before the center of the cab shows it.
- Avoid dragging equipment: Delivery carts and maintenance tools do more damage than normal passenger traffic.
How flooring fits into the elevator lifecycle
The smartest building owners don't look at the floor as a stand-alone purchase. They ask whether it should be timed with cab wall panels, ceilings, fixtures, signal updates, or a later modernization cycle.
That matters because redoing the floor now and then reopening the cab for interior work later can mean duplicate labor. On the other hand, waiting too long can leave a visibly worn cab in service when the mechanical equipment still has useful life left. Good planning sits between those extremes.
A worn floor doesn't automatically mean you need a full modernization. It does mean the cab should be looked at in the context of its age, condition, and upcoming capital work.
For owners in Grand Rapids, Flint, Dearborn, Novi, and throughout Lower Michigan, the long-term value comes from sequencing the work properly, choosing serviceable materials, and keeping the cab clean and dry after installation.
If you're evaluating elevator floor replacement and want a practical review of code, material options, and project sequencing, Crane Elevator Company is one local resource for Lower Michigan property owners who need inspections, repair coordination, modernization support, or a second opinion before the work starts.