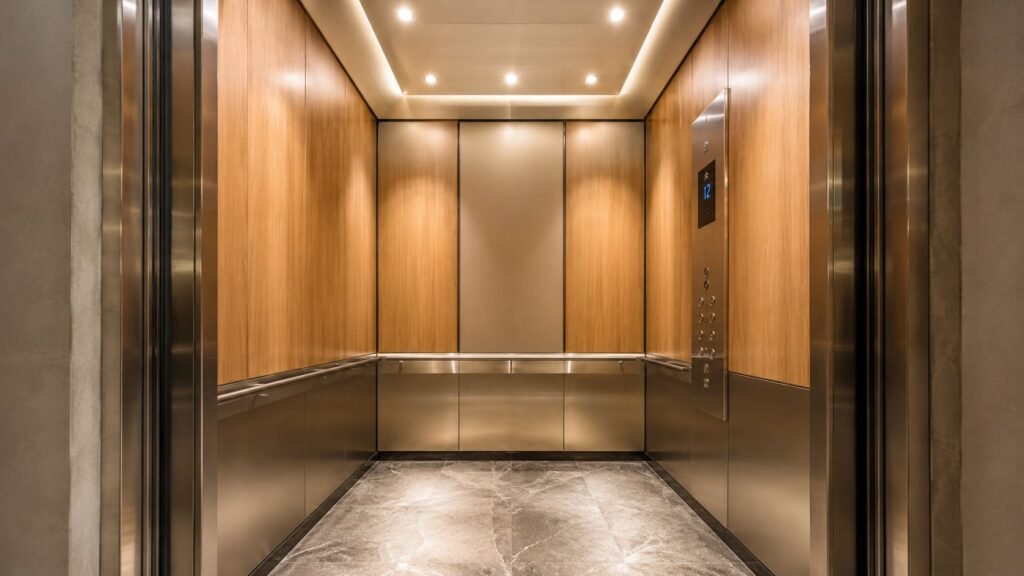
If you're looking at an elevator every day, you already know when the cab has slipped from “acceptable” to “dated.” Scuffed wall panels, dim lighting, loose trim, cracked flooring, scratched stainless, mismatched button fixtures. Tenants notice it. Visitors notice it. Prospective occupants notice it before they notice the quality of your maintenance log.
Most owners start by treating the elevator cab interior like a cosmetic issue. It isn't. It affects how people read the building, how often finishes need repair, how easy the cab is to clean, and whether a future service call turns into a simple part swap or a vendor lock-in problem that follows the property for years.
Why Your Elevator Cab Interior Matters More Than You Think
A worn cab tells people something, even if you never say it out loud. It tells them whether the building is being maintained. It tells them whether management fixes things before they fail. In office, medical, education, municipal, and multifamily settings, the elevator is one of the few interior spaces almost everyone uses.
That's one reason the market has moved well beyond basic metal boxes. The global elevator cab interior market is valued at about $2 billion and is projected to reach around $4 billion by 2033, with a projected 9% CAGR from 2026 to 2033, according to this elevator cab interior market projection. Owners are modernizing aging fleets, not just replacing worn finishes.
What building owners usually see first
The first signs are usually visual, but the underlying issue is operational:
- Damaged wall panels: Scratches, dents, and delamination make the cab look neglected.
- Weak lighting: Dark ceilings make a small cab feel older and less safe.
- Worn flooring: Cracked vinyl, loose edges, or stained surfaces become maintenance headaches.
- Outdated fixtures: Old button panels and trim can make a modernized lobby feel disconnected from the elevator.
- Poor material choices: Decorative finishes that look good on day one often age badly in high traffic service.
Practical rule: If the lobby has been refreshed and the elevator cab hasn't, the elevator will pull the whole property backward.
Why this is more than appearance
A good elevator cab interior does three jobs at once. It supports daily use, it meets accessibility and safety expectations, and it holds up without trapping you in expensive replacement parts later.
Owners who make better cab decisions usually separate two questions early. First, what should the cab look like? Second, what can the building realistically maintain over the long term? Those answers are not always the same. The smartest projects balance both.
The Anatomy of a Modern Elevator Cab
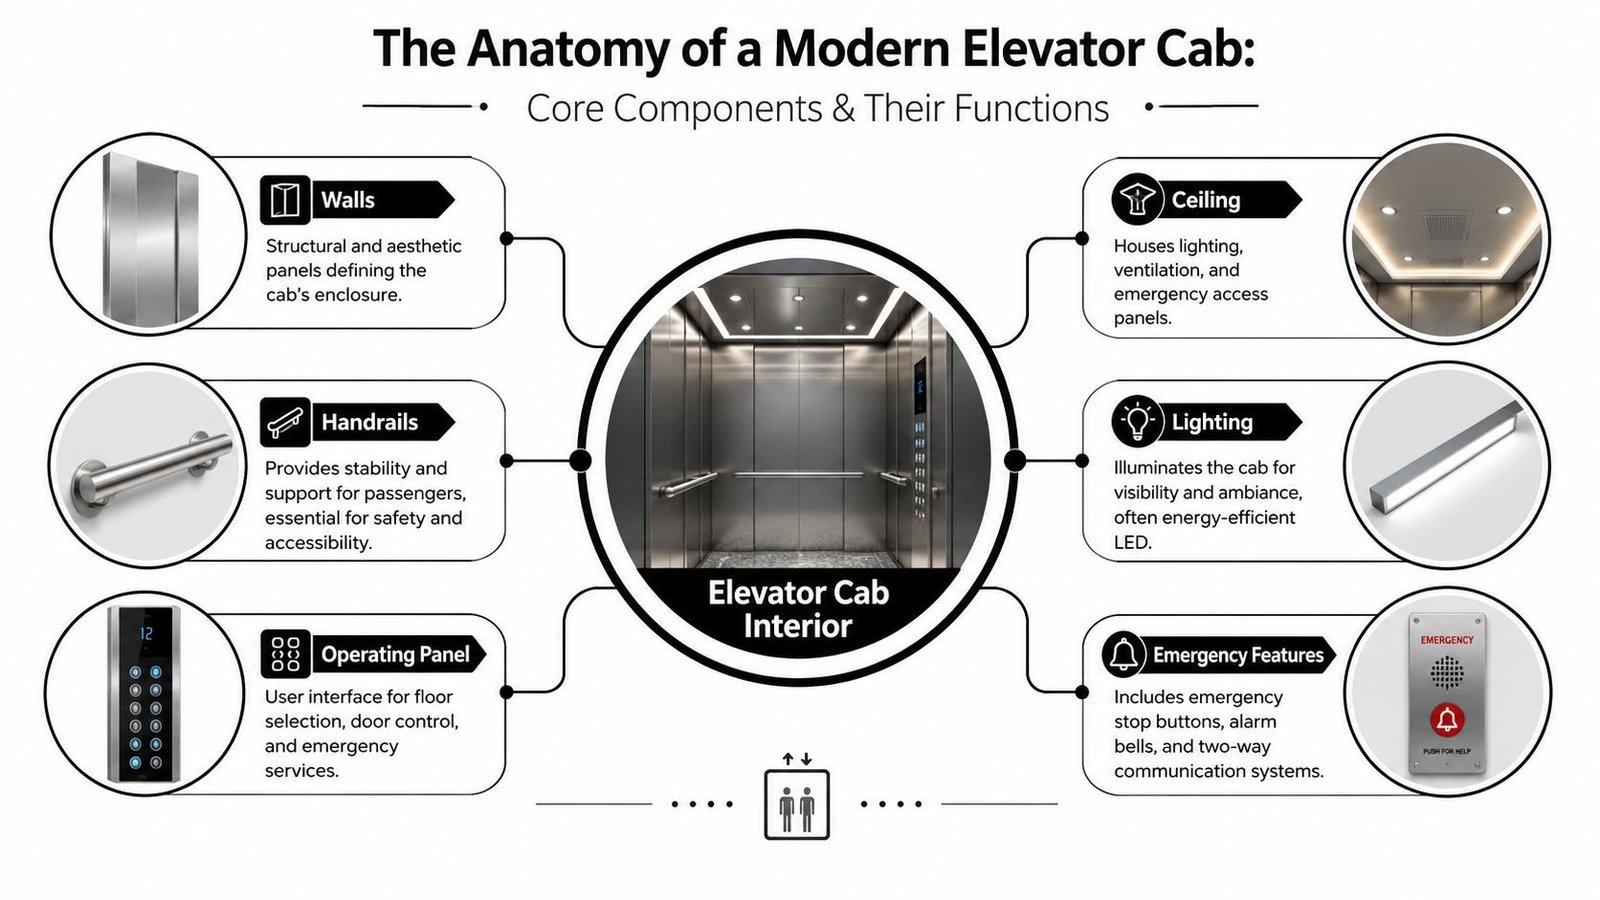
A tenant complains that the cab still feels old even after the lobby renovation. In many buildings, the problem is not one finish. It is a collection of worn parts that no longer work well together. A modern elevator cab interior is a small assembly of surfaces, fixtures, and access points, and each one affects uptime, appearance, and future repair cost.
Walls and panels
Wall panels take the hardest daily abuse. Carts hit them. Bags scrape them. Delivery traffic finds every weak corner and loose edge. On inspection, I look for damaged backing, misaligned reveals, failing fasteners, and finish systems that cannot be repaired without disturbing the whole cab.
This is also where owners get trapped by proprietary interior packages. A custom panel clip, edge trim, or laminated insert may look clean at turnover, but if only one vendor can supply the replacement part, a simple panel swap can turn into a long lead-time service problem. Non-proprietary panel systems usually cost less to maintain because damaged sections can be rebuilt with standard materials and hardware.
Ceiling and lighting
The ceiling does more than hide lights. It often carries lighting, ventilation openings, service access, and part of the cab's visual balance. If the ceiling layout is dated or unevenly lit, the whole car feels older, even when the wall panels are still in fair shape.
LED lighting remains the practical choice in most modernizations because it cuts routine lamp changes and gives more consistent light across the cab. This perception is important in a small enclosure.
Flooring and transitions
Flooring fails at the edges first. Grit, water, cleaning chemicals, and rolling loads all attack the threshold area, and once the edge starts to curl or chip, the cab ages fast. Owners planning an upgrade should look closely at elevator flooring replacement options that can handle traffic without creating a future patchwork problem.
The subfloor matters too. New finish flooring installed over a weak or uneven base rarely holds up the way owners expect.
Operating panel and fixtures
Passengers judge the cab by the operating panel because they touch it every trip. Buttons, indicators, key switches, emergency communication devices, and trim all need to be clean, durable, and serviceable.
Serviceable is the word I would focus on. If the faceplate, button assemblies, or indicator modules are proprietary, every failure becomes more expensive to diagnose and slower to fix. Standardized fixture components usually give owners better long-term value because independent mechanics can source parts without waiting on one manufacturer.
Handrails fall into the same category. They need to feel solid, support safe movement, and fit the cab layout without crowding the entrance or side walls.
Emergency features
Emergency alarms, intercoms or phone equipment, and related hardware should look integrated, not added at the end of the job. A polished cab with awkward emergency hardware usually signals poor planning, and poor planning often leads to harder service access later.
Evaluate the cab as separate working parts: wall system, ceiling, lighting, floor, control fixtures, handrails, and emergency components. That approach shows what needs replacement now, what can be refinished, and where proprietary parts could cost you more over the life of the cab.
Material and Finish Options for Durability and Style
Owners often spend too much money in the wrong place. Materials need to match traffic, cleaning routines, and the image of the building. They also need to be realistic for future repair.
North American buyers continue to favor customizable and premium finishes such as stainless steel, glass, and wood, and the regional market is projected to reach USD 2.67 billion by 2030, according to this North America elevator interior design market report. That trend makes sense, but premium doesn't always mean practical.
Wall finishes that work in real buildings
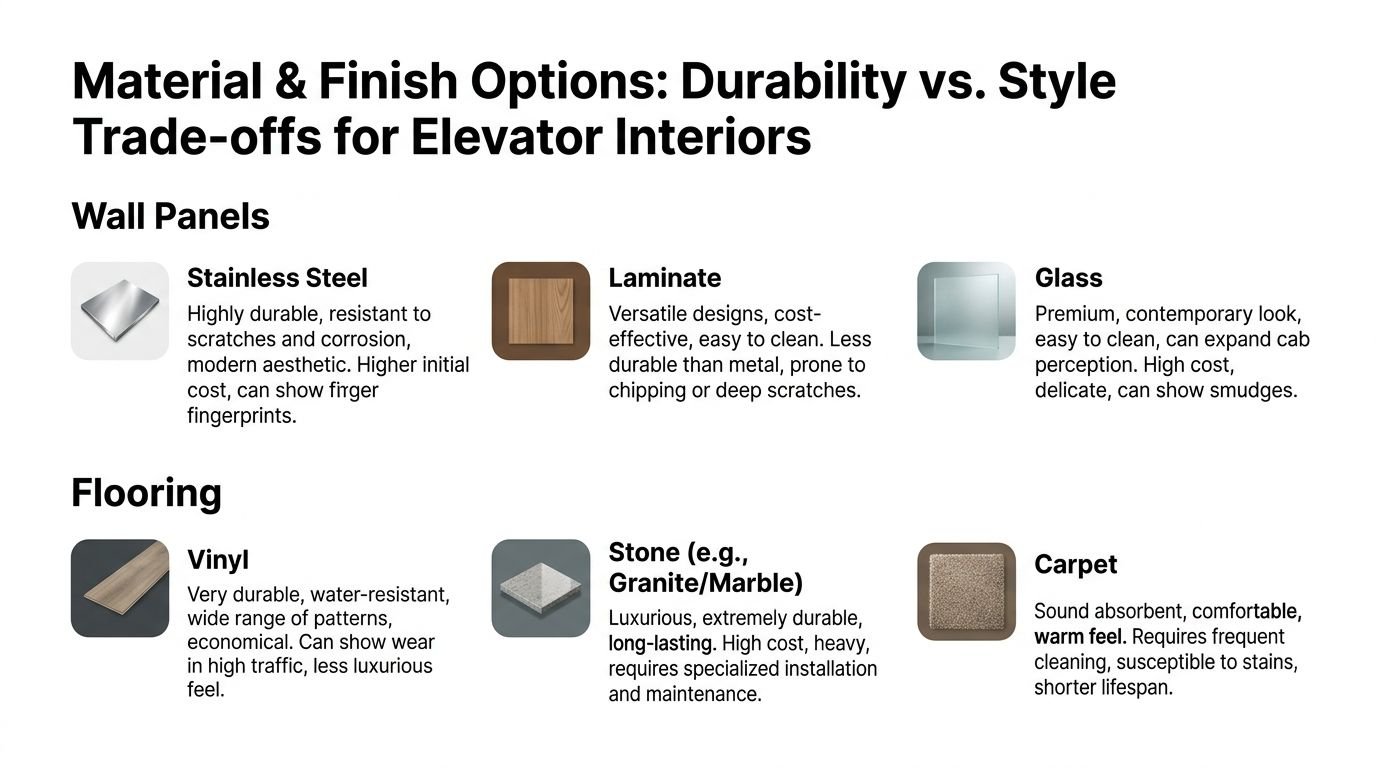
Here's how common options usually perform.
| Material | What works | What doesn't |
|---|---|---|
| Stainless steel | Tough, easy to clean, strong fit for high traffic | Shows fingerprints depending on finish |
| Laminate | Broad design range, lower upfront cost, good for light duty settings | Chips, gouges, and edge damage are harder to hide |
| Glass | Premium look, reflects light well, can make the cab feel larger | Smudges easily, replacement is less forgiving |
| Wood veneer | Warm appearance, strong fit for hospitality or executive environments | More vulnerable to visible wear and harder to patch cleanly |
For commercial work, stainless usually gives the best long-term value. In high-traffic locations, vandal-resistant stainless steel, typically #4 brushed finish or 5WL rigidized metal, is commonly specified for wall cladding and front headers, based on the earlier cited design standards. Rigidized textures can also hide abuse better than smoother decorative skins.
Flooring choices
Flooring is where owners often chase appearance and forget maintenance.
- Vinyl or rubber-type resilient surfaces: Good fit when you need durability and easier upkeep.
- Stone: Strong visual impact, but it adds weight, raises installation complexity, and demands careful execution.
- Carpet: Softens sound, but it's usually the hardest to keep looking clean in public-use elevators.
If you're sorting through options, it helps to review common elevator flooring replacement approaches before locking in a finish package.
The best floor in an elevator isn't the one that looks best in a sample book. It's the one that still looks acceptable after carts, salt, water, and cleaning crews have had at it for years.
What owners often get wrong
A lot of dated interiors weren't built with bad taste. They were built with the wrong priorities. Finishes were selected to impress at turnover, not to survive ordinary service.
A smart elevator cab interior package usually has these traits:
- Replaceable components: A damaged panel or floor section shouldn't require custom fabrication every time.
- Stable finishes: Textures and tones that hide wear better than glossy showpiece materials.
- Cleanability: Janitorial crews need to maintain the cab without specialty products.
- Consistency with the building: The cab should match the property, not compete with it.
Premium style is fine. Just make sure it's attached to durable construction.
Meeting Essential ADA and Safety Code Requirements
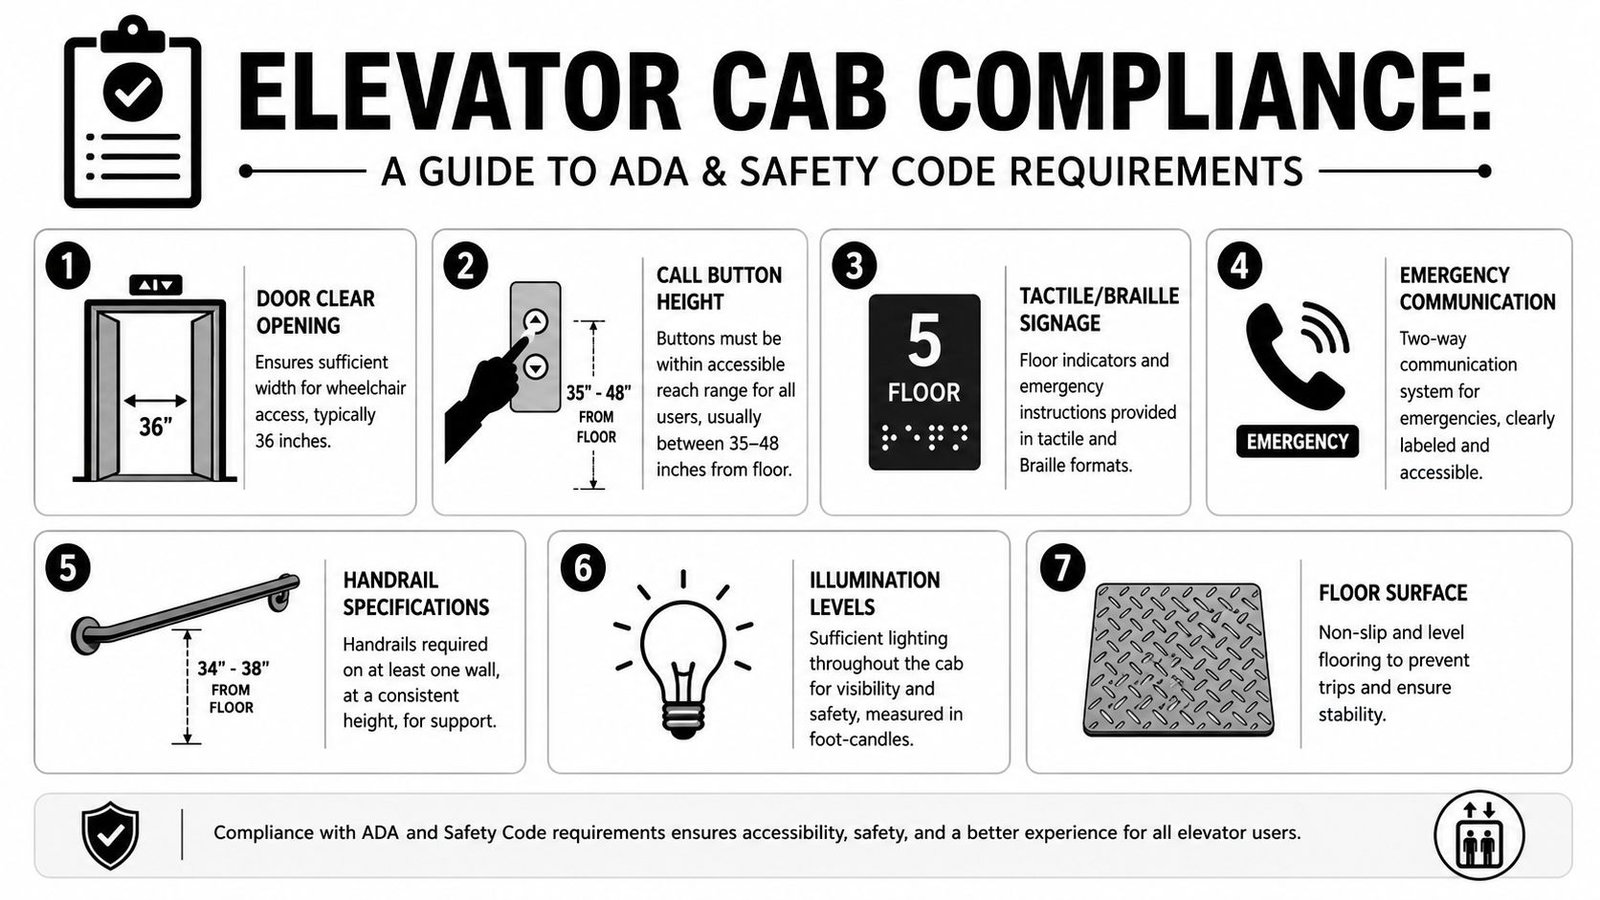
Code review should start before anyone picks panel reveals, ceiling details, or floor thickness. A cab interior can look like a simple finish job and still create real compliance problems if the new materials change fixture heights, reduce clearances, or interfere with door operation. I have seen owners approve a sharp-looking package, then pay to rework it because the control panel ended up too high after the new floor went in.
What owners should verify early
Start with the operating panel. Reach range, button location, hallmarks, emergency devices, and clear access all need to be checked against the finished cab, not the old one. A thicker floor or a reworked return panel can turn an acceptable layout into a correction item.
Door timing deserves the same attention. It affects accessibility, tenant experience, and traffic flow, especially in healthcare, senior living, schools, and public buildings where riders may need more time to enter and exit. Owners reviewing broader elevator code requirements for cab interiors and operation should treat finish design and code review as one decision, not two separate steps.
Lighting matters too. The cab needs even, usable light so passengers can see controls, thresholds, and communication devices clearly. Decorative fixtures that create shadows or hot spots often look better in renderings than they do in service.
Safety problems often start with the finish package
Compliance is not limited to button height. Materials, fastening methods, edge conditions, and fixture protection all affect whether the cab stays safe after a year of regular use.
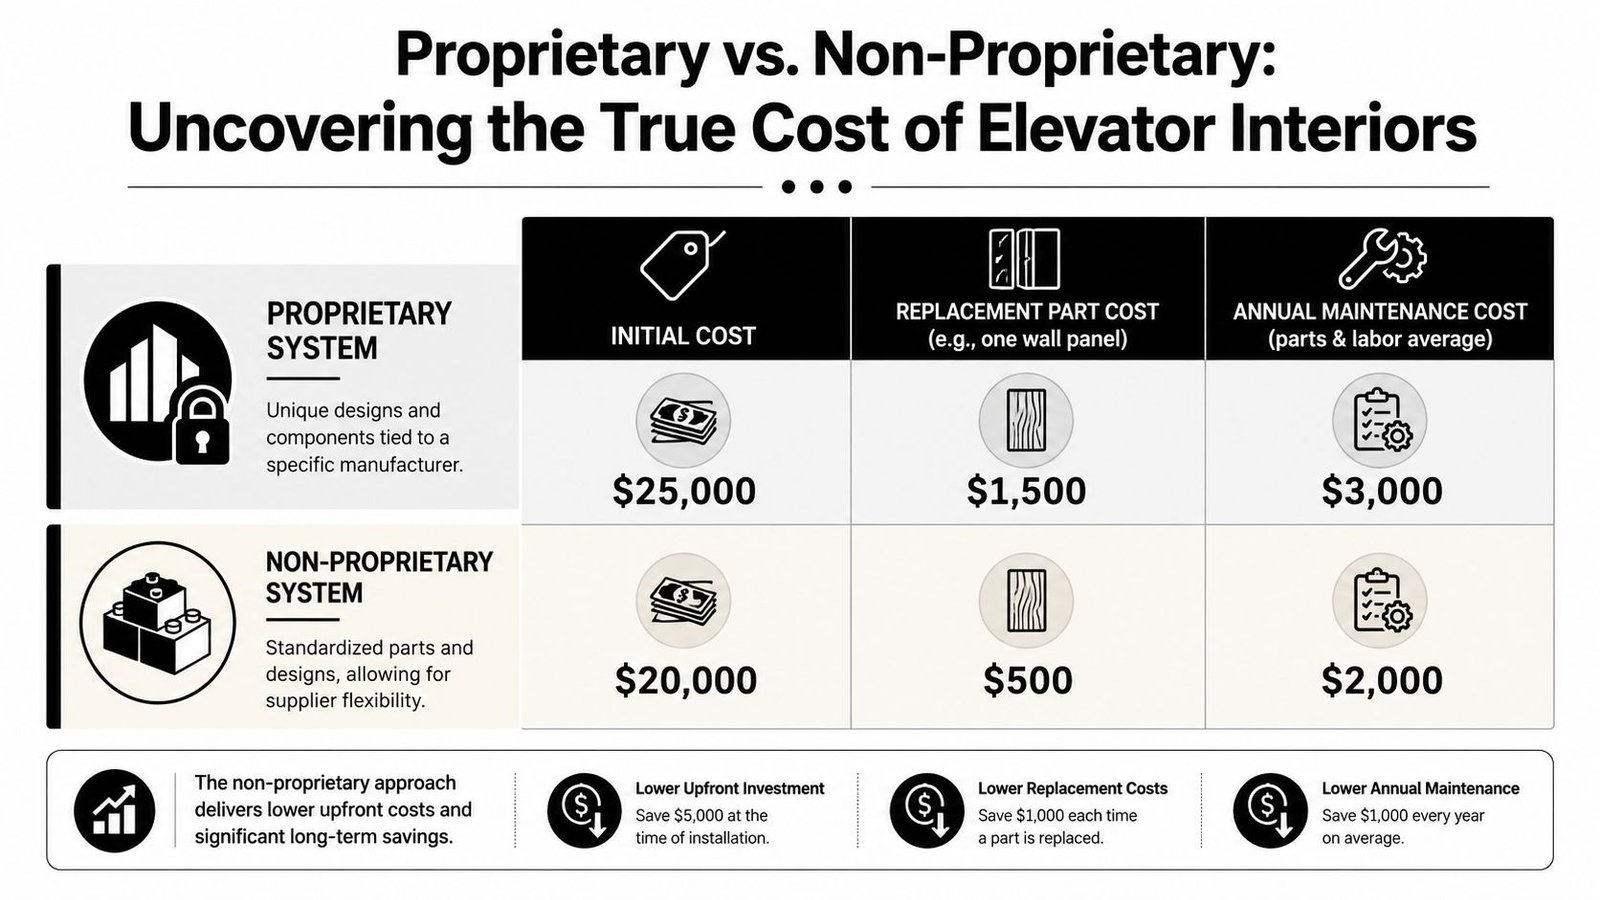
Proprietary interior systems can become expensive in ways owners do not see at bid time. A custom panel clip, branded ceiling module, or one-off trim profile may satisfy the initial design, but if that part gets damaged later, replacement usually means going back to the original supplier. That can mean higher pricing, longer lead times, and fewer repair options. A non-proprietary interior system gives your service contractor more flexibility to source parts, match finishes, and keep the cab compliant without waiting on a single manufacturer.
This video gives useful context on accessibility and design considerations.
A practical review checklist
Before approving an interior package, verify these items with your contractor and consultant:
- Operating panel access: Confirm the final mounting location remains accessible after new wall panels and flooring are installed.
- Door operation: Check hold-open settings, reopening devices, and how the entrance performs for the people who use the building.
- Lighting performance: Make sure the cab is evenly lit and the controls, sill, and communication features stay easy to see.
- Handrail placement: Rails should support riders without crowding the cab or creating clearance conflicts.
- Emergency features: Alarm buttons, phones or communication devices, and related signage need to remain easy to locate and use.
- Serviceability: Ask whether damaged panels, trim, lights, and fixture parts can be replaced with standard components or only through a proprietary source.
Compliance issues are far cheaper to catch in submittals than after the cab is built.
Planning Your Elevator Interior Modernization
Not every project needs the same level of work. Some cabs need a cosmetic reset. Others need a deeper modernization because the finish package, fixtures, and layout have all aged together.
Cosmetic retrofit versus full interior modernization
A cosmetic retrofit usually focuses on visible surfaces. That might include new wall panels, fresh flooring, updated ceiling panels, improved lighting, and trim replacement. This route makes sense when the cab structure is sound and the existing fixture arrangement still works.
A full interior modernization goes further. It can include new control fixtures, revised panel layouts, new handrails, ceiling redesign, more substantial lighting changes, and coordination with broader elevator work. This path is more disruptive, but it gives you a better chance to solve older design decisions that no longer fit the building.
When a lighter approach is enough
A simpler interior project often works when:
- The cab frame is still solid: No major structural deterioration behind the finish system.
- The layout remains functional: The controls, rails, and fixtures are located appropriately.
- Your main problem is appearance: Worn surfaces, outdated colors, and weak lighting are the main issues.
- Downtime has to stay limited: Occupied buildings often need a faster return to service.
When to go deeper
A bigger modernization is usually the better call when the problems stack up. The walls are damaged, the ceiling looks patched together, the floor is tired, the operating panel feels obsolete, and the overall cab no longer matches the building. At that point, dressing over the issues often wastes money.
One mistake owners make is approving a surface package over bad bones. If the backing, mounting, or fixture integration is poor, the finished product won't age well.
If the cab has multiple generations of patchwork repairs, stop thinking in terms of touch-up work. Start thinking in terms of reset.
The business questions that matter
The right project scope usually comes down to four decision points:
- How long do you plan to hold the property? Short-term cosmetic improvement and long-term serviceability are different strategies.
- How much disruption can the building tolerate? Medical and municipal facilities usually have tighter operational constraints than some office buildings.
- What does the rest of the property look like? A renovated lobby next to a neglected cab creates a mismatch people notice immediately.
- Will the chosen interior still be easy to service later? This matters more than most bid packages admit.
Good planning starts with honest answers to those questions, not with finish samples.
The Hidden Costs of Proprietary Elevator Interiors
This is the part many owners don't hear until after the contract is signed. Two elevator cabs can look almost identical on turnover and perform very differently over time because one uses proprietary components and the other uses non-proprietary components.
That difference shows up later, when a wall panel gets damaged, a light assembly fails, or a decorative trim piece needs replacement.
What proprietary really means
A proprietary interior system uses parts, panel designs, lighting assemblies, or trim details tied to one manufacturer or one narrow supply channel. On paper, the package may look polished and integrated. In practice, it can limit who can service it and where replacement parts come from.
That matters because industry data shows that proprietary interior components can add a 20% to 30% cost premium, especially when they prevent third-party servicing and lock owners into single-source vendor contracts, as noted in this guide to elevator modernization and maintenance cost issues.
The same source also states that 60% of elevator modernization budgets are consumed by parts and labor. Once you understand that, the long-term risk becomes obvious. If the parts side of the equation is locked up, your future pricing flexibility disappears.
Where owners get trapped
These are the usual problem areas:
- Custom wall skins: A damaged section may need to come from the original supplier only.
- Specialized LED columns or ceiling assemblies: A simple lighting repair becomes a branded parts issue.
- Unique trim profiles: Minor cosmetic damage turns into a sourcing delay.
- Manufacturer-specific fixture packages: Even small replacements can require matching proprietary hardware.
A non-proprietary approach avoids much of that by using parts and materials that qualified elevator professionals can source and service more broadly. If you're evaluating that path, review the logic behind non-proprietary elevators before you compare bids only on the upfront package price.
Cheap to install and expensive to maintain is one of the oldest tricks in this business.
The better long-term approach
The best elevator cab interior isn't just durable. It's serviceable. That means a dented panel, failed light, or worn trim piece can be addressed without waiting on a single manufacturer to price and release the part.
Owners should ask a direct question during bidding: “Can any qualified provider service this interior in the future?” If the answer is vague, the package probably isn't as open as it looks.
A cab interior should help you control lifetime cost, not surrender it.
How to Budget and Procure Your Cab Interior Project
Budgeting goes better when owners stop asking for “a new cab interior” and start defining the exact scope. A finish refresh, a more substantial interior rebuild, and a broader modernization package are three different procurements even if they all improve appearance.
Cab size is one of the first cost drivers. Commercial passenger elevator cabs typically range from 24 to 38 square feet, with widths of 68 to 80 inches and depths of 51 to 68 inches, according to this elevator cab dimension reference. More surface area means more material, more fitting time, and more labor around edges, trim, lighting integration, and panel alignment.
What drives cost in the field
The final price usually moves based on a handful of practical issues:
| Cost driver | Why it matters |
|---|---|
| Cab dimensions | Larger cabs require more wall, ceiling, and floor material |
| Material selection | Stainless, glass, stone, laminate, and resilient flooring all install differently |
| Condition of existing cab | Hidden damage behind old panels can change the job quickly |
| Fixture reuse or replacement | Keeping some elements may reduce scope, but only if they still fit the new design |
| Building operations | Occupied sites often require tighter scheduling and disruption control |
How to request better bids
Good procurement is less about collecting the most quotes and more about asking better questions. Use a bid request that forces clarity.
Ask each contractor:
- Scope clarity: Are you replacing wall panels only, or walls, ceiling, floor, rails, trim, and fixtures?
- Serviceability: Are the proposed materials and parts proprietary or broadly serviceable?
- Code review: Who verifies that the final interior package still meets accessibility and safety requirements?
- Downtime planning: How will the work be phased to reduce disruption for tenants, staff, patients, or residents?
- Replacement strategy: If one panel or one light assembly is damaged later, how is that handled?
- Finish matching: How will the contractor address future spot repairs if a material line changes?
What a strong project brief includes
A useful owner brief usually includes these items:
- Existing conditions photos from all cab walls, ceiling, floor, sill, and operating panel areas.
- The building type and traffic pattern, since a school, clinic, apartment, and office won't age finishes the same way.
- Your maintenance priority, especially whether you prefer premium appearance or easier repair.
- A clear answer on proprietary restrictions, because that affects lifetime cost more than many finish choices do.
The best procurement outcome usually comes from owners who stay focused on the full life of the elevator cab interior, not just the install date. A clean design matters. So does the day a panel gets dented and someone has to fix it without turning a minor repair into a sourcing ordeal.
If you're planning an elevator cab interior upgrade in Lower Michigan, Crane Elevator Company can help you evaluate the trade-offs before you commit. Their team handles non-proprietary modernizations, repairs, inspections, and ongoing maintenance for commercial and residential vertical transportation, with practical guidance aimed at long-term serviceability, code compliance, and predictable ownership costs.